User Guide
About TeachMeSenpai
TeachMeSenpai is a desktop app targeted at NUS teaching assistants who have many students to keep track of. It is tailored to assist you in monitoring your students’ progress, and details.
As a teaching assistant, you can add all your students’ particulars, make notes about them, quickly navigate through your long list of students and so much more! If using our app seems daunting to you at first, don’t worry, we even have an autocomplete feature to guide you through every step of the way! Tailored to fast-typists, TeachMeSenpai is built around a Command Line Interface (CLI), complete with an autocomplete feature and a Graphical User Interface (GUI) to help you manage your students quicker than a traditional point-and-click app can.
About this User Guide
This user guide provides everything you need to know to set up TeachMeSenpai and how to use its features. Head over to the Quick Start section to get started with setting up, or the Features section to learn more about what TeachMeSenpai can do for you! If at any point there are any unfamiliar terms, you may head over to the Glossary for an explanation.
Navigating the User Guide
Note Box
Tip Box
Warning Box
Hyperlinks
Links: Words highlighted in blue are clickable and will direct you to a relevant section within this user guide for more information, or to external websites to learn more!
Table of Contents
- About TeachMeSenpai
- About this User Guide
- Quick start
- Guide to TeachMeSenpai’s GUI
- Guide on using Features
- Parameter descriptions
-
Features
- Autocompletion
- Viewing help:
help - Exiting the program:
exit - Listing all students:
list - Adding a student:
add - Delete a student:
delete - Editing a student:
edit - Editing remark of student:
remark - Showing a student’s remark:
show - Find/filter students:
find/filter - Undo a previous command:
undo - Redo a previous
undo:redo - Clearing all entries:
clear - Saving the data
- Editing the data file
- Glossary
- Command summary
- Prefix summary
- Appendix: Editing the data file
Quick start
TeachMeSenpai has been designed to work for all Operating Systems (Mac, Windows, or Linux etc.)!
- Ensure you have
Java 11or above installed in your computer (you may refer to Java Help Resources if you’re not sure how to do so). - Download the latest
teachmesenpai.jarfrom here. - Copy or move the file to the folder you want to use as the home folder for your application.
- Double-click the file to start the app.
- If everything works well, you should be able to see the following User Interface.

Guide to TeachMeSenpai’s GUI
TeachMeSenpai has several important components as part of its display. Here is a quick walk-through each component.
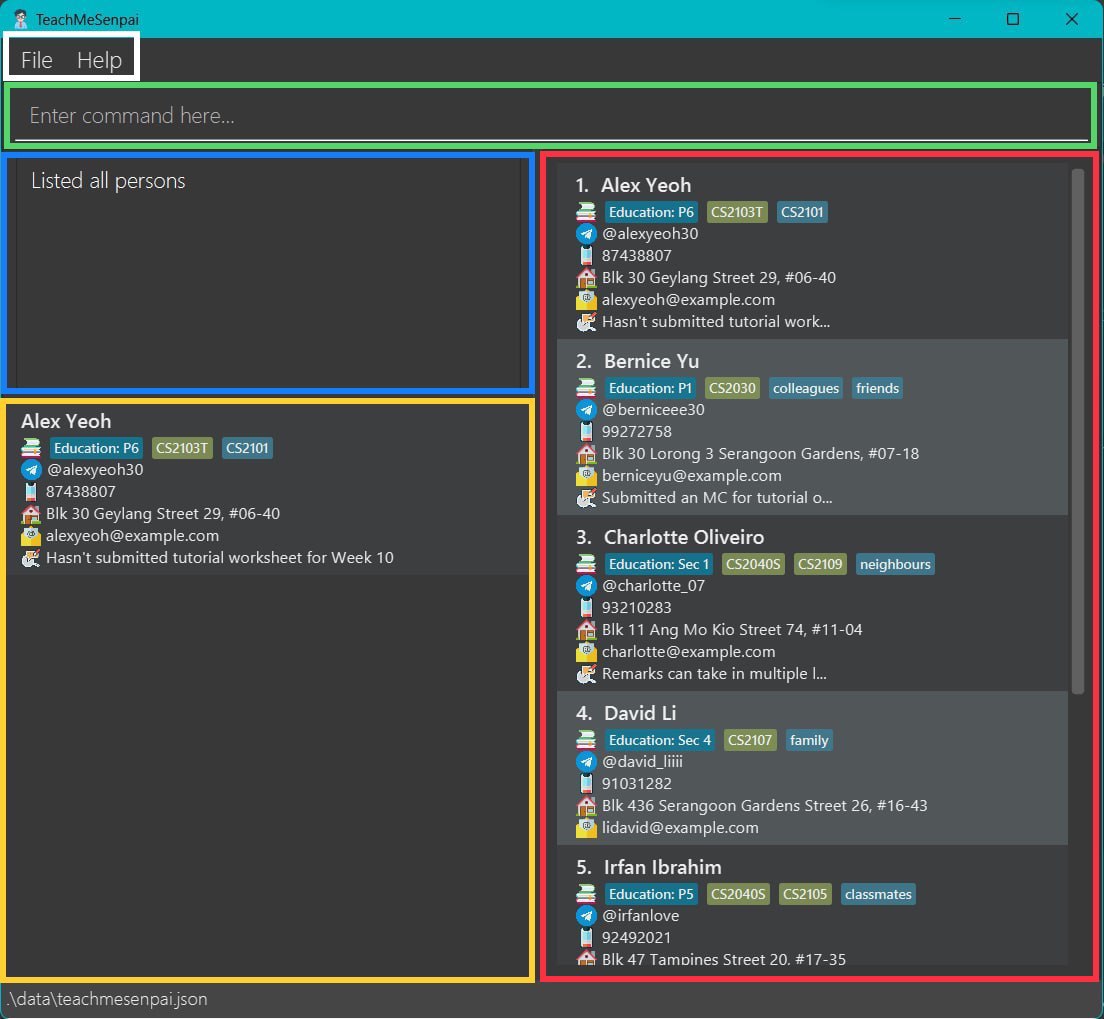
Menu bar
- Clicking
Filewill give you the option to exit the app - Clicking
Helpwill showHelp F1, clicking it will provide you a link to this User Guide!
Command line
- This is where you will be typing all the commands for TeachMeSenpai! To learn more about the commands TeachMeSenpai has, head over to Features.
Feedback Box
- This is where TeachMeSenpai will provide you with feedback for your commands! Whether they were successfully done or not. You will see more examples of the feedback TeachMeSenpai provides in the Features section.
Result Box
- This is where the results for commands like
showandeditwill show up! - This section is scrollable when necessary.
Student List
- This is where you can view all your student entries and their details!
- This section is scrollable as well.
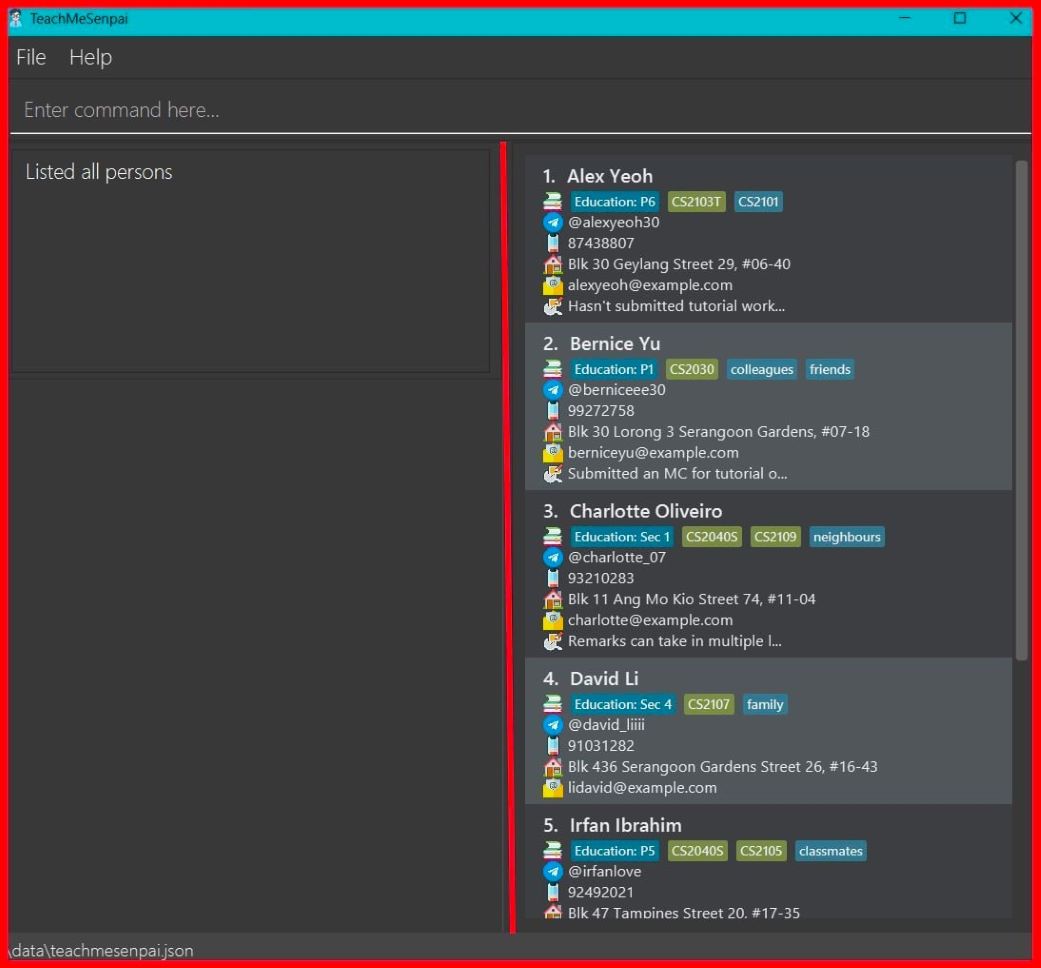
Adjusting the size of TeachMeSenpai
If the app is too small for your liking, you may resize it by dragging the sides of the window with your cursor! The red lines in the image below are moveable so feel free to adjust the app however you like!
Guide on using Features
Parameter descriptions
Firstly, parameters are the inputs/information you have to fill in together with their respective commands in the command line when using TeachMeSenpai!
Here is an exhaustive table for you to refer to if you’re unsure of what to input when using the various features below this section!
| Parameter | Meaning | Notes |
|---|---|---|
ADDRESS |
Address of the student. | Can contain numbers, symbols and multiple letters/words |
EDUCATION |
Education level of the student. | Can contain numbers and multiple letters/words |
EMAIL |
Email address of the student. | 1. Follow the format local-part@domain 2. Must contains @ symbol 3. Must not start with a non-alphanumeric character (eg. . , ‘ “ @) 4. Can contain letters and numbers 5. Should not contain any spacings |
INDEX |
The number next to the student entry upon using list. |
Must be a positive number (eg. 1, 2, 3…) |
MODULE |
The module you’re teaching the student. | 1. Can only contains alphanumeric characters and/or spaces 2. Any whitespaces in front of the module given will be removed by the app |
PHONE |
Phone number of the student. | 1. Must only contain numbers 2. Must be at least 3 numbers long |
REMARK |
Your notes or remarks on the student. | Can contain any combination of words, numbers and special characters |
NAME |
Name of the student. | 1. Can only contain alphanumeric characters and/or spaces 2. Any whitespaces in front of the name given will be removed by the app |
TAG |
Qualities of the student you’d like to be shown as a tag. | Must be a single word containing alphanumeric characters only |
TELEGRAM |
Telegram handle of the student. | 1. Must begin with “@” 2. Can only contain uppercase and lowercase alphabets, digits (0-9), and underscores 3. Minimum length is 5 characters |
![]() Note: The description for a valid Telegram handle has been shortened for brevity and thus might not cover all cases.
Note: The description for a valid Telegram handle has been shortened for brevity and thus might not cover all cases.
- For example, one might think that “@hello__world” is allowed but it isn’t due to having consecutive underscores.
- TeachMeSenpai does validate handles according to Telegram specifications, but do check on the Telegram application for whether a handle is valid!
Features
![]() Notes about the command format:
Notes about the command format:
-
Words in
UPPER_CASEare the parameters to be supplied by the user.
(eg. inadd n/NAME,NAMEis a parameter which can be used asadd n/John Doe) -
Items in square brackets are optional.
(eg.n/NAME [t/TAG]can be used asn/John Doe t/friendor asn/John Doe) -
Items with
...after them can be used multiple times including zero times.
(eg.[t/TAG]...can be excluded completely, or oncet/friend, or twicet/friend t/family, etc.) -
Parameters can be specified in any order.
(eg. if the command specifiesn/NAME p/PHONE,p/PHONE n/NAMEis also acceptable) -
If a parameter is expected only once in the command but you specified it multiple times, only the last occurrence of the parameter will be taken.
(eg. if you specifyp/12341234 p/56785678, onlyp/56785678will be taken) -
Extraneous words for commands that do not take in parameters (such as
help,list,redo,undo,show,exitandclear) will be ignored.
(eg. if the command entered ishelp 123, it will be interpreted ashelp)
Autocompletion
TeachMeSenpai has a lot of features for you to experiment with, and we understand that it might take some getting used to. Hence, we’ve included an autocompletion feature!
Start typing the first letters of a command to get shadow-like autocomplete suggestions. The format of the suggested parameters are as described in the Guide on using Features.
TAB key to fill in the next suggested word!

Additionally, for the module, tag and education parameters, it will also suggest all the existing values to you!

| seen above are not part of the commands TeachMeSenpai accepts. They’re simply there to separate the different existing modules/education/tags you have in the current student list.
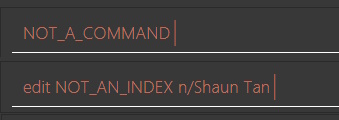
The autocompletion feature also hints to you if you’ve entered an invalid command-word or an invalid index!
Viewing help: help
Shows a URL to the User Guide page.

F1 as a keyboard shortcut to view the help pop-up!.
Exiting the program: exit
Exits the program.
Format:
exit
x button.
Listing all students: list
Shows a list of all students. This is useful for displaying the full list after using commands that modifies the list (eg. find).
Format:
list
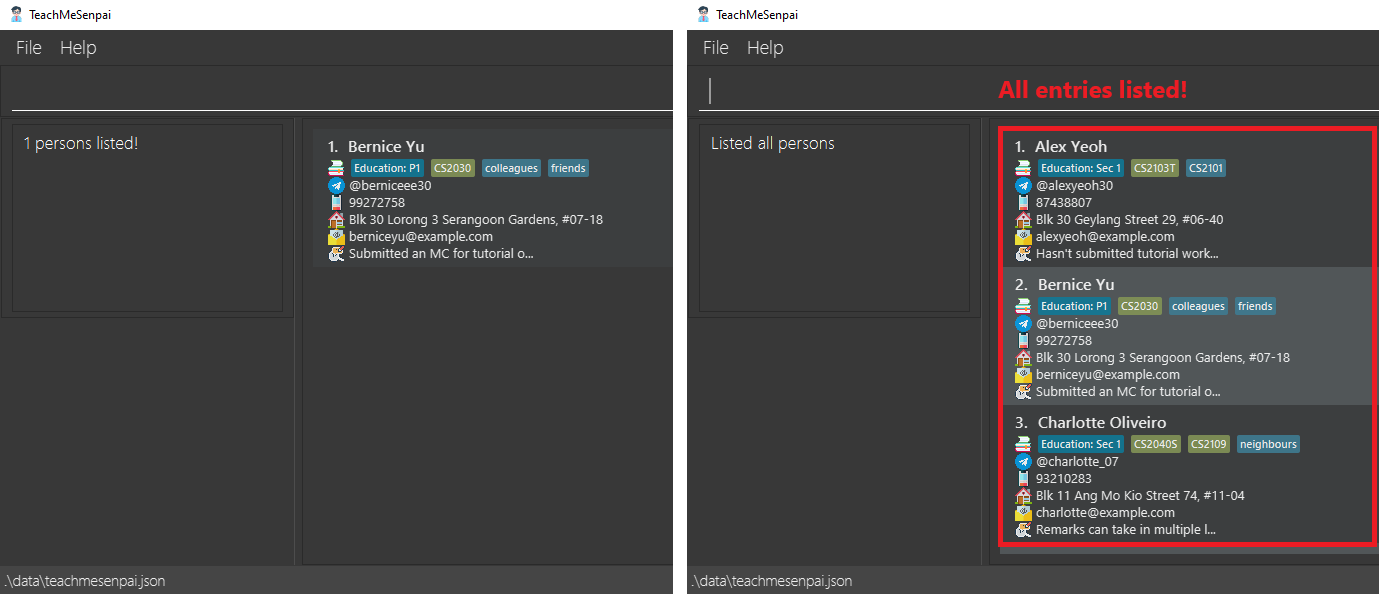
Above: Before and after entering list command
Adding a student: add
Adds a student to the list, along with their education level and any student-specific notes.
Format:
add n/NAME [a/ADDRESS] [p/PHONE] [e/EMAIL] [edu/EDUCATION] [tele/TELEGRAM] [r/REMARK] [t/TAG]... [m/MODULE]...
- NAME: Alphanumeric word(s).
- ADDRESS: The student’s address.
- PHONE: A student’s phone number that only contains numbers and is as least 3 numbers long.
- EMAIL: A valid email follows the
local@domainformat.- EDUCATION: Alphanumeric word(s)
- TELEGRAM: A valid telegram handle must start with
@and follows Telegram’s username specifications- REMARK: Can be sentences or even paragraphs.
- TAG: A detail about a student (limited to one word long).
- MODULE: The module code the student is taking (can be multiple words).
For more details and examples on the parameters, please refer to the Parameter descriptions!
![]() Note:
Note:
-
EDUCATION,TAG, andMODULEwill be displayed as coloured tags under the student’s name. - Only the name ie.
n/is compulsory. You can add/edit details for other parameters using theeditcommand. - The current version of TeachMeSenpai allows you to add students with the same name (case-insensitive), phone number, and/or telegram handle! However, we have planned a future enhancement that will only allow unique names (case-sensitive), phone numbers, and telegram handles.
Examples:
add n/Shaun a/123 NUS Street r/Good in Japanese t/submitted m/CS2103Tadd n/Shao Hong edu/Bachelors y2 r/Good in German m/CS2101add n/Wen Li e/e07123456@u.nus.edu p/91234567 a/Kent Ridge PGPR tele/@wenlisan r/Very hardworking :)
Using the following input add n/Shao Hong edu/Bachelors y2 r/Good in german m/CS2101

Above: Before and after entering add command with student's details
Delete a student: delete
Deletes the student(s) at the specified index(es) from the student list.
Format:
delete INDEX [INDEX]...
- Deletes the student at the specified
INDEX. - More than 1
INDEXcan be specified, and all of them will be deleted. - The index refers to the index number shown in the displayed student list.
- The index must be a positive integer 1, 2, 3, …
- There must not have any duplicate indexes.
INDEX or if one of the INDEX specified are invalid (do not correspond to a student in the list), the command won’t execute.
Examples:
-
listfollowed bydelete 2deletes the 2nd student in the student list. -
delete 1 4deletes the 1st and 4th student in the student list.
Using the following input delete 1 4
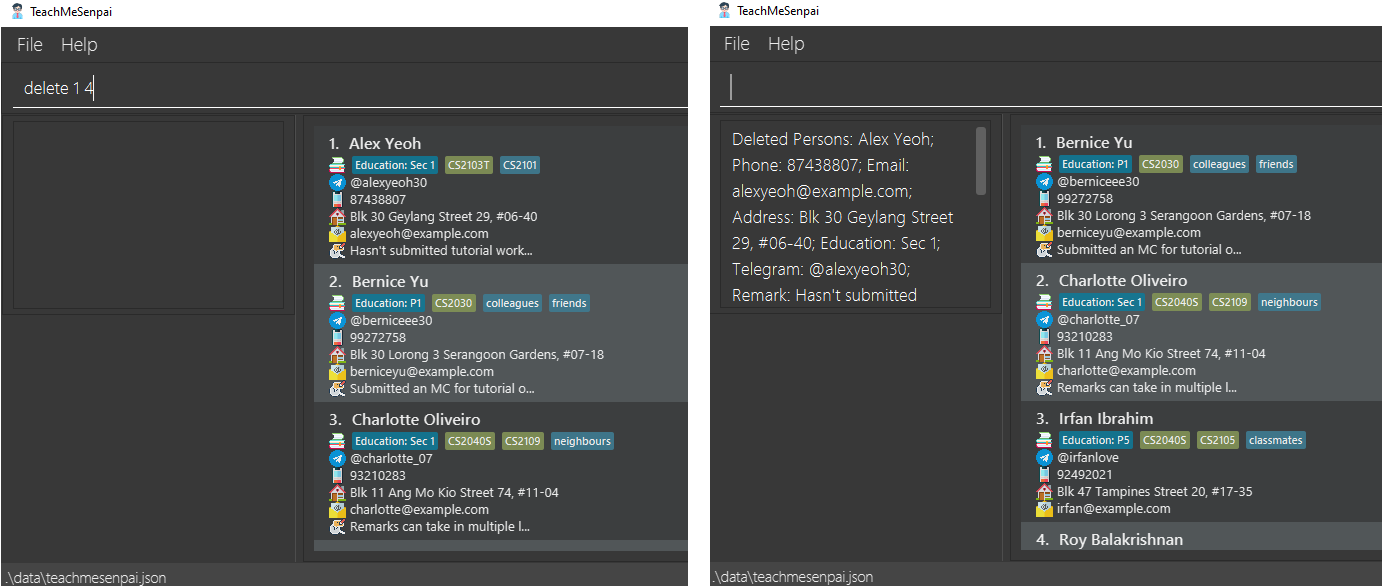
Above: Before and after entering delete 1 4 command
find and delete when you have a very long list of students.
For instance, you can
find the student(s) you want gone, and then delete using the index from the list displayed!
Editing a student: edit
Edits a student’s information (all information except remarks). To remove a student’s parameter, leave the value after the prefix blank (eg. a/ p/ to remove address & phone number).
Format:
edit INDEX [n/NAME] [a/ADDRESS] [p/PHONE] [e/EMAIL] [edu/EDUCATION] [tele/TELEGRAM] [t/TAG]... [m/MODULE]...
- The index refers to the index number shown in the displayed student list.
- The index must be a positive integer 1, 2, 3, …
- NAME: Alphanumeric word(s).
- ADDRESS: The student’s address.
- PHONE: A student’s phone number that only contains numbers and is as least 3 numbers long.
- EMAIL: A valid email follows the
local@domainformat.- EDUCATION: Alphanumeric word(s)
- TELEGRAM: A valid telegram handle must start with
@and follows Telegram’s username specifications- TAG: A detail about a student (limited to one word long).
- MODULE: The module code the student is taking (can be multiple words).
For more details and examples on the parameters, please refer to the Parameter descriptions!
![]() Note:
Note:
-
editcommand cannot edit the remark parameter of students. Use theremarkcommand for editing remarks. -
editcommand does not allow you to change the name of a student to an existing student’s name in the student list!
Examples:
edit 2 n/Shaun Tan r/Not good in Japaneseedit 1 n/Lao Hong-
edit 3 a/ p/(removes student’s address & phone number)
Using the following input edit 1 edu/Year 1
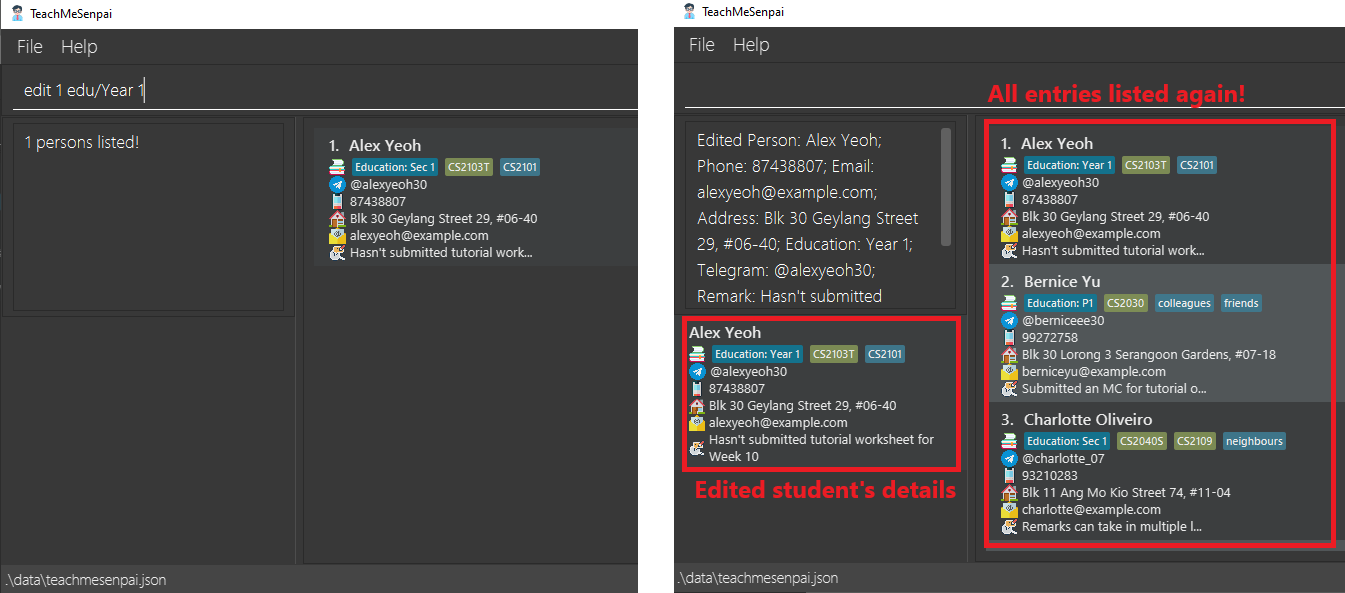
Above: Before and after entering edit 1 edu/Year 1 command
![]() Note: After using
Note: After using edit, the edited student will show up in the result box to help you view all the
edited student’s details.
Editing remark of student: remark
Edits a student’s remarks.
Format:
remark INDEX [REMARK]
- The index refers to the index number shown in the displayed student list.
- The index must be a positive integer 1, 2, 3, …
With remark you can type your desired remarks and notes into the popup text box! The text box can take in
multiple sentences, paragraphs etc. When you are done, you can simply press Ctrl + S
and your remarks will be saved once the text box closes.
Examples:
remark 2
Using the following input remark 2:
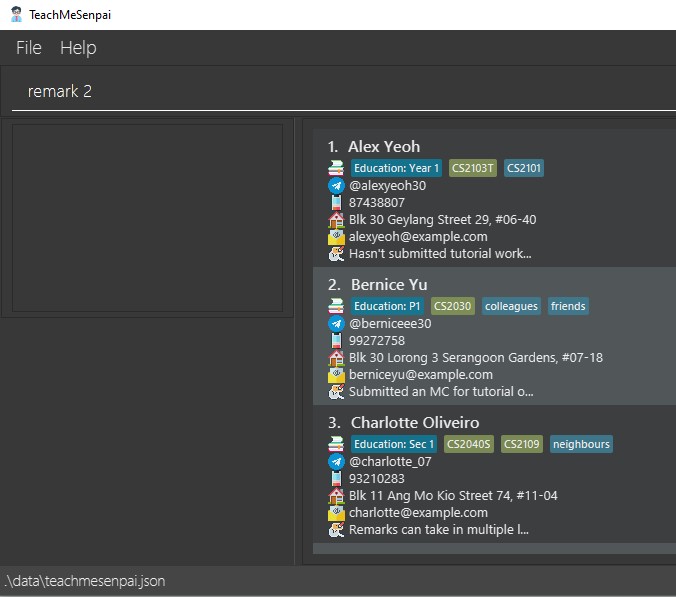
Above: Before entering remark 2 command
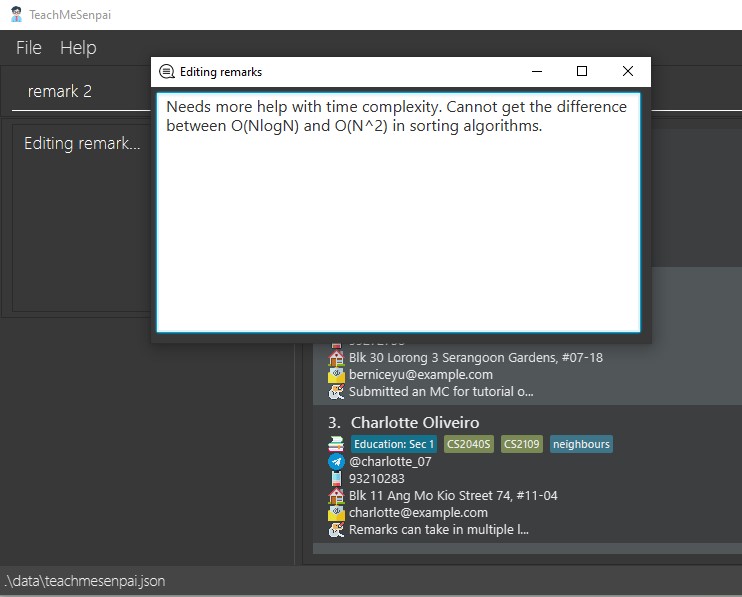
Above: Editing remarks using the remark 2 command
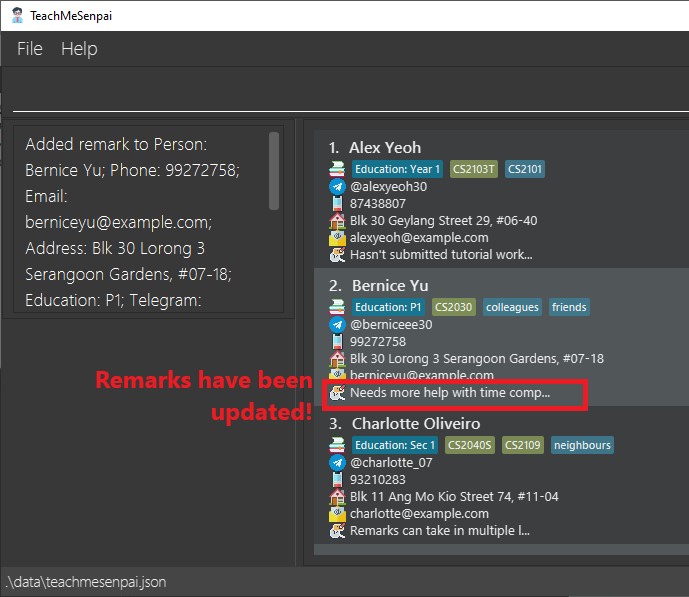
Above: After pressing CTRL + S
show feature!
Showing a student’s remark: show
Displays all the details, including the full remark of a specified student. This is useful for when the remark is too long to be displayed fully in the student list panel.
Format:
show INDEX
Examples:
show 1
Using the following input show 1:
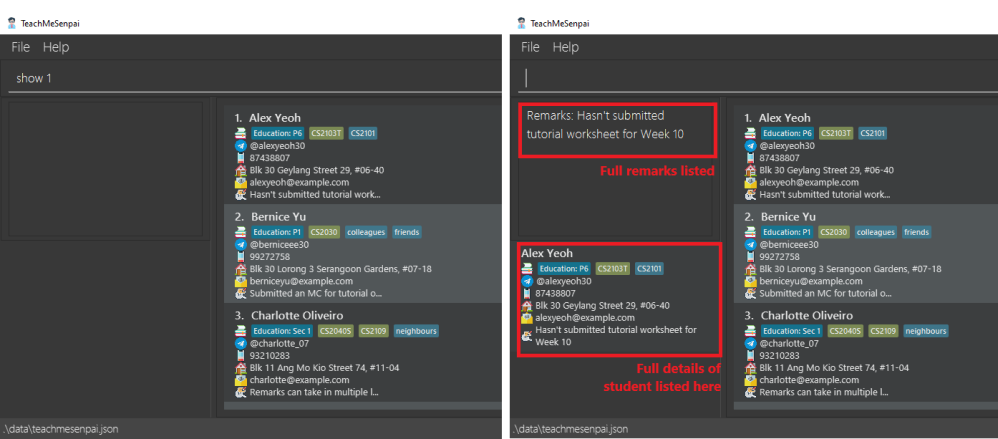
Above: Before and after entering show 1 command
Find/filter students: find/filter
Finds students based on a keyword in the parameter that you want.
The find and filter commands allow you to match keywords or partial keywords with the entries, for example:
Find
The find command allows you to zoom in on entries that matches all search criterias!
find n/Sh n/Na displays the students with names containing both sh and na (case-insensitive), such as Shanna or Nashira. This partial-keyword matching (eg. matching sh in Shaun) applies to all parameters EXCEPT tags and modules, where you will have to enter the keywords in full.
Format:
find [n/NAME]... [p/PHONE]... [e/EMAIL]... [a/ADDRESS]... [edu/EDUCATION]... [tele/TELEGRAM]... [r/REMARK]... [t/TAG]... [m/MODULE]...
Filter
Unlike find, the filter command instead show entries that match at least one of the search criterias!
filter n/Sh n/Na displays the students with names containing either sh or na (case-insensitive), such as Sheryl or Nala. Same as find, partial-keyword matching doesn’t apply to tags and modules, where you will have to enter the keywords in full.
Format:
filter [n/NAME]... [p/PHONE]... [e/EMAIL]... [a/ADDRESS]... [edu/EDUCATION]... [tele/TELEGRAM]... [r/REMARK]... [t/TAG]... [m/MODULE]...
Please refer to the Prefix Summary for more details!
![]() Tip:
Tip:
- Using
findwithout specifying any fields has the same outcome aslist! TeachMeSenpai will simply display the list of all your students. - Using
filterwithout specifying any fields will result in an empty list!
Examples:
-
find n/Shwill display the students named “Shao Hong” & “Shaun” -
find a/paswill display students who stay at places which names that containpassuch asPasir Ris -
find t/URGENTwill display students who have the exact tagURGENT -
find m/CS2101will display students who have the exact moduleCS2101
Using the following input find n/a m/CS2103T:
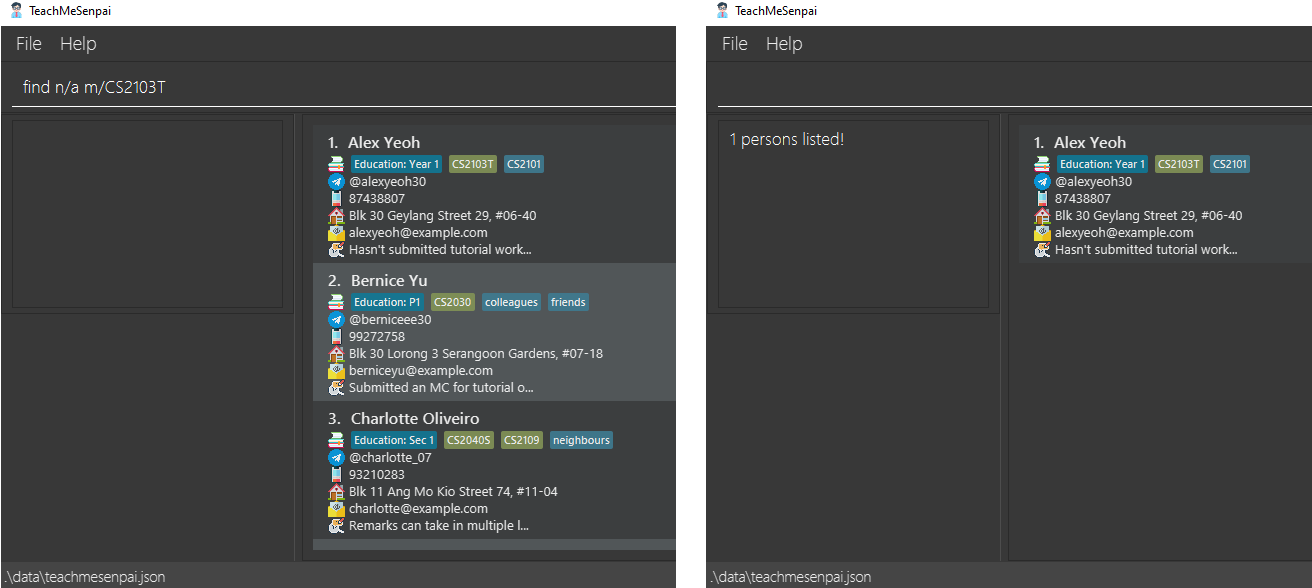
Above: Before and after entering find n/a m/CS2103T command
![]() Note: Here find shows only
Note: Here find shows only Alex Yeoh as his entry matches all criteria.
Using the following input filter n/a m/CS2103T :
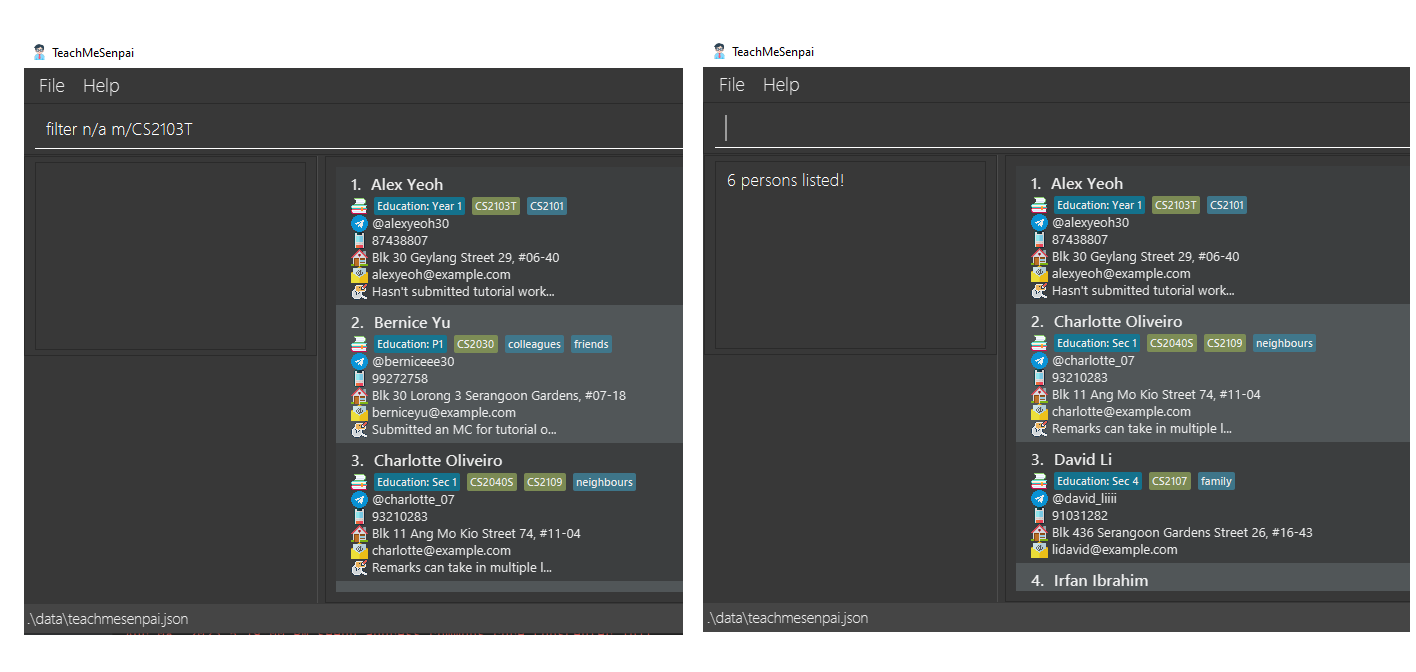
Above: Before and after entering filter n/a m/CS2103T command
Roy Balakrishnan, who only matches n/a
are shown too.
find followed by an edit will result in the full student list being shown! (similar to running a third command list)
Undo a previous command: undo
Did you make a mistake with a command? Don’t worry, simply undo it!
You can undo as many times as required, as long as any of your previous commmands were undoable. All undoable commands are given below!
add, edit, delete, remark, clear, and redo commands as these are the only commands that change the data of your TeachMeSenpai app! Trying to undo without having ANY of the above commands prior will cause TeachMeSenpai to show you an error message
Format:
undo
Examples:
-
delete 2followed by ‘undo’ will delete the 2nd student in the list, butundowill reverse this deletion and add the student back. -
add n/Wen Li p/88889999followed byundowill add a student Wen Li, butundowill remove this entry from the list. -
listfollowed byundowill cause TeachMeSenpai to give you an error message sincelistis not undoable -
delete 2followed bylistthenundowill reverse the deletion done beforelist!
Using the following inputs delete 1 4 followed by undo:
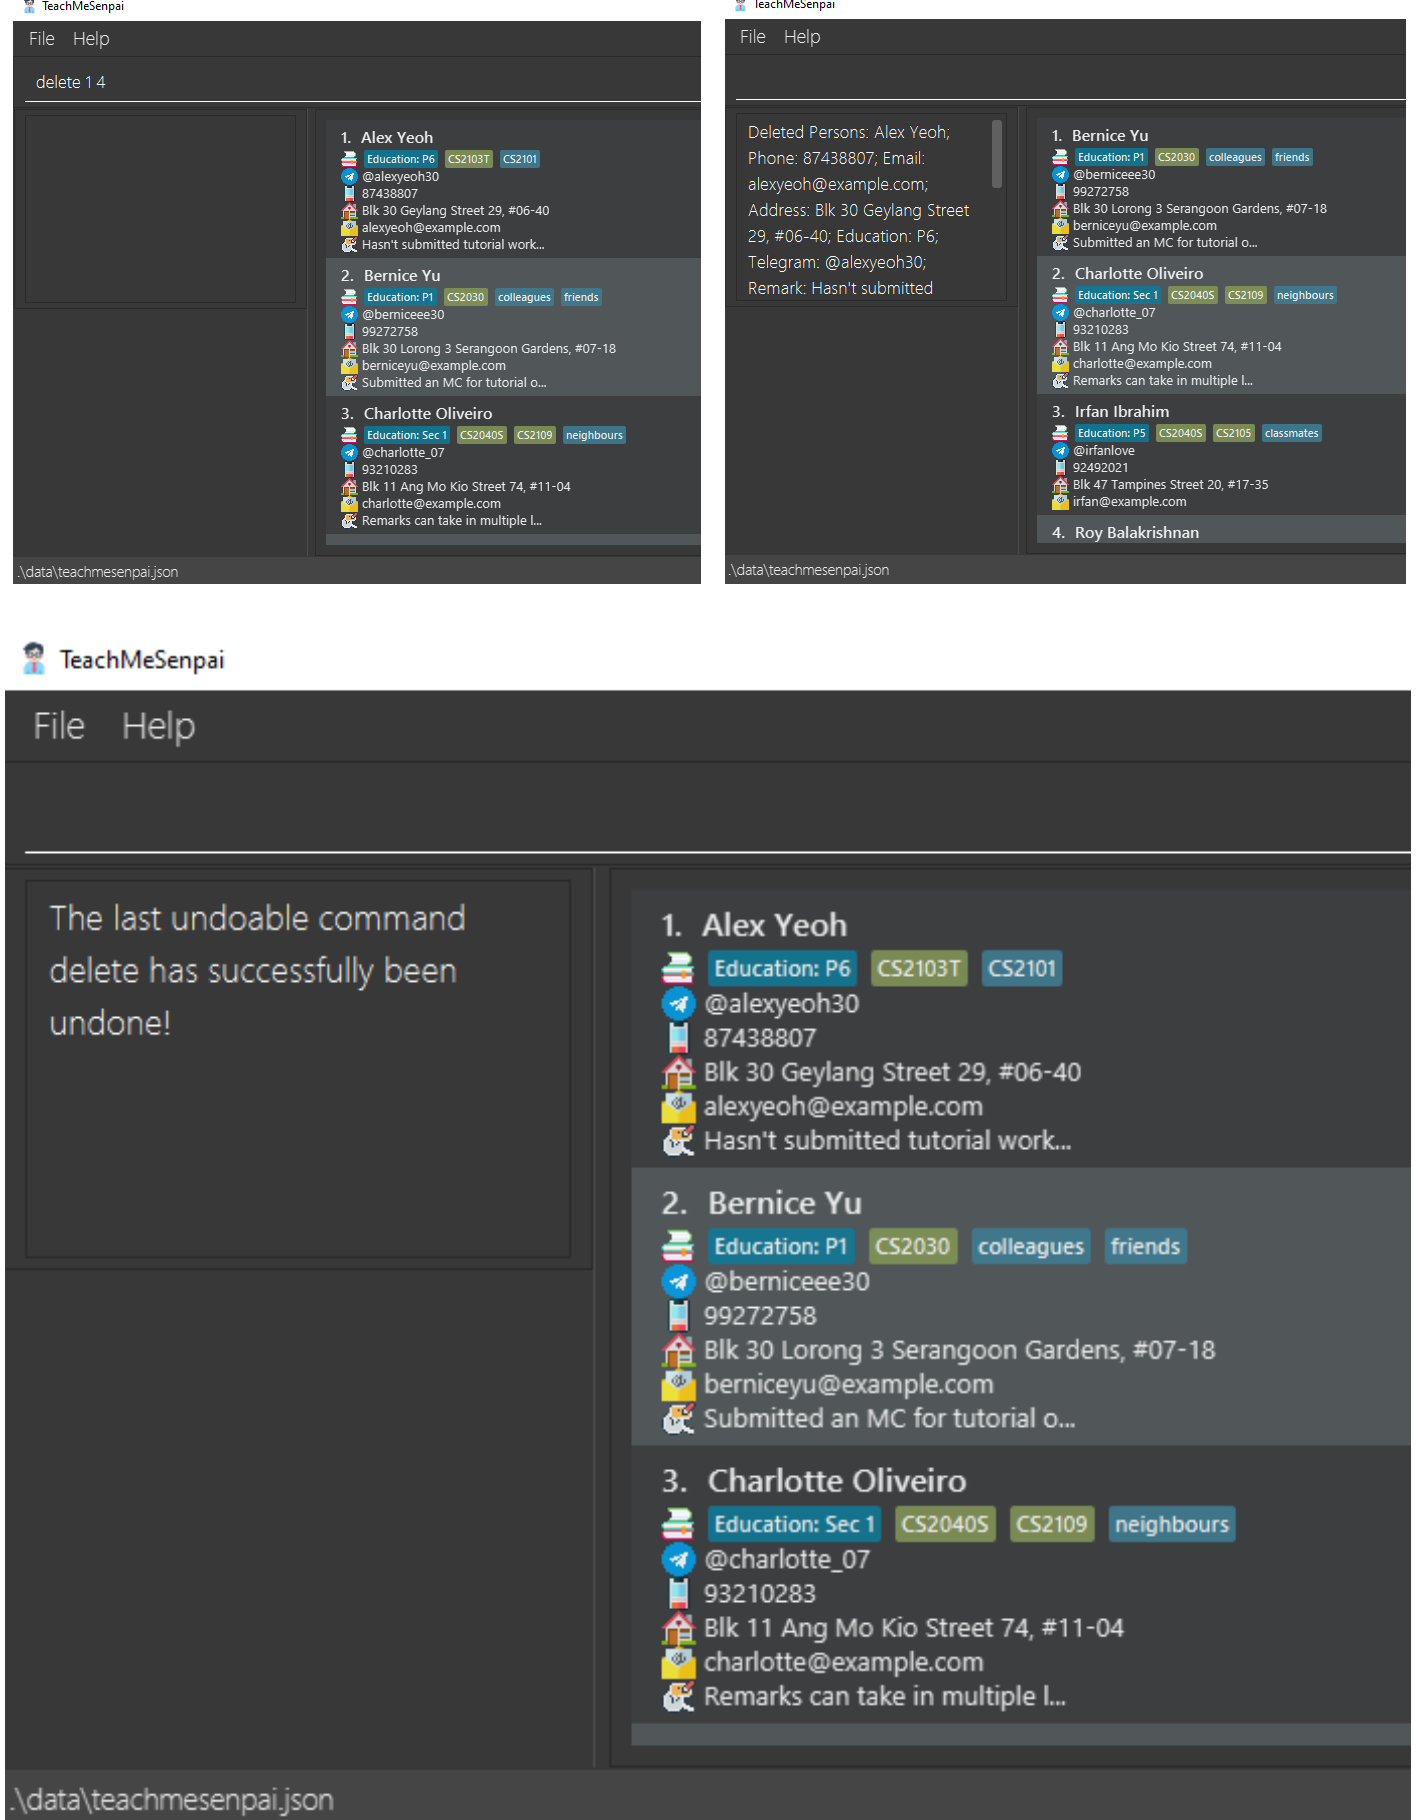
Above: Original state before entering delete 1 4, before entering undo command and after entering undo command
Redo a previous undo: redo
Did you undo a command on accident? Fret not, you may use redo to reverse the changes done by undo!
undo command. Trying to redo without ANY prior undo command will simply cause TeachMeSenpai to give you an error message.
Format:
redo
Examples:
-
delete 2, followed byundo, thenredohas the same effect asdelete 2 -
listfollowed byredowill result in an error message from TeachMeSenpai. -
delete2 followed byredowill result in an error message from TeachMeSenpai.
Clearing all entries: clear
Need to clear all your entries? Simply use clear to help you delete all your entries at once!
Format:
clear
undo to reverse the change! Do note that if you exit the app immediately after clear, using undo upon relaunching the app can’t retrieve your data anymore :(
Saving the data
TeachMeSenpai data are saved in the hard disk automatically after any command that changes the data. There is no need to save manually 🙂
The file containing your data can be found in the same folder teachmesenpai.jar is found in on your computer.
Editing the data file
![]() Warning: Do not attempt to edit the data file unless you are an advanced user and understand some basic computing terminlogies.
If your changes to the data file makes its format invalid, TeachMeSenpai will discard all data and start with an empty data file the next time you launch it.
If you’d still like to edit the data file directly, please proceed to Appendix: Editing the data file.
Warning: Do not attempt to edit the data file unless you are an advanced user and understand some basic computing terminlogies.
If your changes to the data file makes its format invalid, TeachMeSenpai will discard all data and start with an empty data file the next time you launch it.
If you’d still like to edit the data file directly, please proceed to Appendix: Editing the data file.
Glossary
| Term | Details | Examples |
|---|---|---|
| Alphanumeric | Characters that are either a numbers or letters. | 1, 2, 3, a, b, c are alphanumeric |
| Command | Instructions for TeachMeSenpai to execute/carry out. |
Features are commands TeachMeSenpai can execute. For example, add is a command! |
| Command Line Interface (CLI) | A Command Line Interface allows users to use text as command to be executed by an application. | The command line acts as a CLI in this case. |
| Graphical User Interface (GUI) | A Graphical User Interface allows users to interace with an application through graphics like icons, menus etc. | TeachMeSenpai acts as a GUI in this case. |
| Index | The number displayed next to the student entry’s name after list is used. |
1. Alex Yeoh, 1 would be the index for Alex Yeoh. |
| Integer | An integer is a whole number. | 1, 10, 100 are integers. 1.5, 0.00 are not integers! |
| Keyword | The word you want to find/filter by. | A keyword for a student named “Shao Hong” could be “Shao Hong” |
| Operating System | Also known as (OS) of the computer, managers the software and hardware on the computer. | Windows 10, Windows 11, Linux, Mac. |
| Parameter | Parameters are information TeachMeSenpai requires you to fill in. |
NAME, PHONE are parameters you have to fill in. Relevant information to fill in could be Shaun and 999 respectively. You may refer to the Parameter descriptions for more specifications and examples. |
| Partial keyword | Part of the word you want to find/filter by. | A partial keyword for a student named “Shao Hong” could be “Sh”, or “on” etc. |
| Prefix | Indicators for commands. Always ends with a slash / and comes before a parameter. |
n/ is the prefix for parameter NAME which could be a name like Shaun. You may refer to Prefix Summary to see all the prefixes used in TeachMeSenpai. |
| Remark | Notes or things to take note of for a student. | “Not good in Japanese”, “Has not submitted MC” etc. |
Command summary
| Action | Format, Examples | |
|---|---|---|
| Add |
add n/NAME [a/ADDRESS] [p/PHONE] [e/EMAIL] [edu/EDUCATION] [tele/TELEGRAM] [r/REMARK] [t/TAG]... [m/MODULE]...eg. add n/Shaun a/123 NUS Street e/shaun123@gmail.com edu/Year 1 r/Good in Japanese t/active t/hardworking m/CS2103T m/CS2101
|
|
| Clear | clear |
|
| Delete |
delete INDEX [INDEX]...eg. delete 3 or delete 1 2 3 4
|
|
| Edit |
edit INDEX [n/NAME] [a/ADDRESS] [p/PHONE] [e/EMAIL] [edu/EDUCATION] [tele/TELEGRAM] [t/TAG]... [m/MODULE]... eg. edit 1 n/Wen Li edu/Year 2
|
|
| Exit | exit |
|
| Filter |
filter [n/NAME]... [p/PHONE]... [e/EMAIL]... [a/ADDRESS]... [edu/EDUCATION]... [tele/TELEGRAM]... [r/REMARK]... [t/TAG]... [m/MODULE]... eg. filter a/tampines |
|
| Find |
find [n/NAME]... [p/PHONE]... [e/EMAIL]... [a/ADDRESS]... [edu/EDUCATION]... [tele/TELEGRAM]... [r/REMARK]... [t/TAG]... [m/MODULE]... eg. find n/Sh |
|
| Help | help |
|
| List | list |
|
| Redo | redo |
|
| Remark |
remark INDEX [REMARK] eg. remark 2 Not good in Japanese
|
|
| Undo | undo |
|
| Show |
show INDEX eg. show 1
|
Prefix summary
| Prefix | Meaning | Example |
|---|---|---|
| n/ | Name of student | n/Shao Hong |
| p/ | Phone number of student | p/81234567 |
| e/ | Email of student | e/e07123456@u.edu.sg |
| a/ | Address of student | a/16 Bukit Timah Road, S156213 |
| edu/ | Education level of student | edu/P6 |
| r/ | Remark for student | r/Good in German |
| t/ | Tag of student |
t/active or t/hardworking ...
|
| m/ | Module that the student is being taught |
m/CS2101 or m/CS2101 m/CS4243 ...
|
| tele/ | Telegram handle of the student |
tele/@chuuchuu or tele/@sO_m4nY
|
Appendix: Editing the data file
The default data file contains the sample data from TeachMeSenpai. To edit the data, simply follow the format for each parameter you’d like to edit.
The code below is a direct quote from the default data file.
{
  "persons" : [ {
    "name" : "Alex Yeoh",
    "phone" : "87438807",
    "email" : "alexyeoh@example.com",
    "address" : "Blk 30 Geylang Street 29, #06-40",
    "remark" : "Hasn't submitted tutorial worksheet for Week 10",
    "education" : "P6",
    "telegram" : "@alexyeoh30",
    "modules" : [ "CS2103T" ],
    "tagged" : [ "CS2101" ]
  }, {
    "name" : "Bernice Yu",
    "phone" : "99272758",
    "email" : "berniceyu@example.com",
    "address" : "Blk 30 Lorong 3 Serangoon Gardens, #07-18",
    "remark" : "Submitted an MC for tutorial on Week 8",
    "education" : "P1",
    "telegram" : "@berniceee30",
    "modules" : [ "CS2030" ],
    "tagged" : [ "colleagues", "friends" ]
  }, {
    "name" : "Charlotte Oliveiro",
    "phone" : "93210283",
    "email" : "charlotte@example.com",
    "address" : "Blk 11 Ang Mo Kio Street 74, #11-04",
    "remark" : "Remarks can take in multiple lines of input \nsee!",
    "education" : "Sec 1",
    "telegram" : "@charlotte_07",
    "modules" : [ "CS2040S", "CS2109" ],
    "tagged" : [ "neighbours" ]
  }, {
    "name" : "David Li",
    "phone" : "91031282",
    "email" : "lidavid@example.com",
    "address" : "Blk 436 Serangoon Gardens Street 26, #16-43",
    "remark" : "",
    "education" : "Sec 4",
    "telegram" : "@david_liiii",
    "modules" : [ "CS2107" ],
    "tagged" : [ "family" ]
  }, {
    "name" : "Irfan Ibrahim",
    "phone" : "92492021",
    "email" : "irfan@example.com",
    "address" : "Blk 47 Tampines Street 20, #17-35",
    "remark" : "",
    "education" : "P5",
    "telegram" : "@irfanlove",
    "modules" : [ "CS2040S", "CS2105" ],
    "tagged" : [ "classmates" ]
  }, {
    "name" : "Roy Balakrishnan",
    "phone" : "92624417",
    "email" : "royb@example.com",
    "address" : "Blk 45 Aljunied Street 85, #11-31",
    "remark" : "",
    "education" : "P3",
    "telegram" : "@royyy123",
    "modules" : [ "CS4243" ],
    "tagged" : [ "colleagues" ]
  } ]
}
persons is an array containing every student entry as an element. Each element is enclosed in curly braces {}
The parameters in the braces indicate which parameter in the Parameter descriptions the input should adhere to.
-
name: Represents the student’s name. Cannot be empty. (NAME) -
phone: Represents the student’s phone number. If the student entry lacks a phone value, omit the “phone” row. (PHONE) -
email: Represents the student’s email. If the student entry lacks an email value, omit the “email” row. (EMAIL) -
address: Represents the student’s address. If the student entry lacks an address value, omit the entire “address” row. (ADDRESS) -
remark: Represents the remark or notes for a student. If the student entry lacks a remark, input""or omit the “remark” row. (REMARK) -
education: Represents the education level of a student. If the student entry lacks an education value, omit the “education” row. (EDUCATION) -
telegram: Represents the telegram handle of a student. If the student entry lacks a telegram value, omit the “telegram” row. (TELEGRAM) -
modules: Represents an array of modules the student takes. If the student entry lacks module values, input[]. (MODULE) -
tagged: Represents an array of tags the student is labelled with. If the student entry lacks tags, input[]. (TAG)
After making the desired changes, simply save the data file, and re-launch TeachMeSenpai again.