Developer Guide
About TeachMeSenpai
TeachMeSenpai is a student managing application specially customised for teaching assistants (TA) in NUS who have a lot of students to keep track of. TeachMeSenpai is optimised for fast-typists with a Command Line Interface (CLI) with the benefits of a Graphical User Interface (GUI).
This Developer Guide provides in-depth documentation on the design and implementation consideration behind TeachMeSenpai. This guide covers everything you need to know from the architecture down to the feature implementation details of TeachMeSenpai.
If you’re eager to get started with TeachMeSenpai, head over to Setting up, getting started! If you’d like to learn more about how TeachMeSenpai was implemented, you can head over to Implementation! You may use this guide to evolve TeachMeSenpai to suit your needs.
Table of Contents
- About TeachMeSenpai
- Acknowledgements
- Setting up, getting started
- Design
- Implementation
- Documentation, logging, testing, configuration, dev-ops
- Appendix: Requirements
- Appendix: Effort
- Appendix: Planned enhancements
- Appendix: Instructions for manual testing
Acknowledgements
- This project is based on the AddressBook-Level3 project created by the SE-EDU initiative
- Libraries used: JavaFX, Jackson, JUnit5
- All icons used are taken from flaticon
- The autocompletion feature was inspired by a similar feature in AY2223S1-CS2103T-T12-2’s tp. We started out with their code, and slowly (and almost completely) overhauled, including refactoring, bug-fixing, adding asserts, and changing the behaviour of the feature to suit our needs.
- The idea of adding the placeholder text (eg. the
NAMEinn/NAME) to thePrefixclass also came from AY2223S1-CS2103T-T12-2’s tp, which gave us the idea to further add more things to the prefix (like whether the prefix is optional), although that was our idea. - The undo and redo features were reused with modifications from AY2223S1-CS2103T-W17-4’s tp, which was adapted from the proposed implementation in AB3’s Developer Guide DG. The changes include renaming, some different implementation, and modification to include of a variable to track the undone/redone commands in the
VersionedAddressBookclass.
Setting up, getting started
Refer to the guide Setting up and getting started.
Design
.puml files used to create diagrams in this document can be found in the diagrams folder. Refer to the PlantUML Tutorial at se-edu/guides to learn how to create and edit diagrams.
Architecture
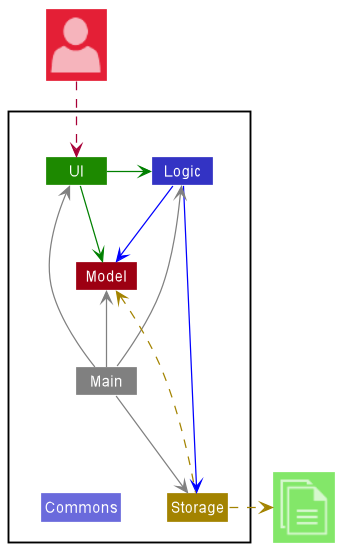
The Architecture Diagram given above explains the high-level design of the App.
Given below is a quick overview of main components and how they interact with each other.
Main components of the architecture
Main has two classes called Main and MainApp. It is responsible for,
- At app launch: Initializes the components in the correct sequence, and connects them up with each other.
- At shut down: Shuts down the components and invokes cleanup methods where necessary.
Commons represents a collection of classes used by multiple other components.
The rest of the App consists of four components.
-
UI: The UI of the App. -
Logic: The command executor. -
Model: Holds the data of the App in memory. -
Storage: Reads data from, and writes data to, the hard disk.
How the architecture components interact with each other
The Sequence Diagram below shows how the components interact with each other for the scenario where the user issues the command delete 1.
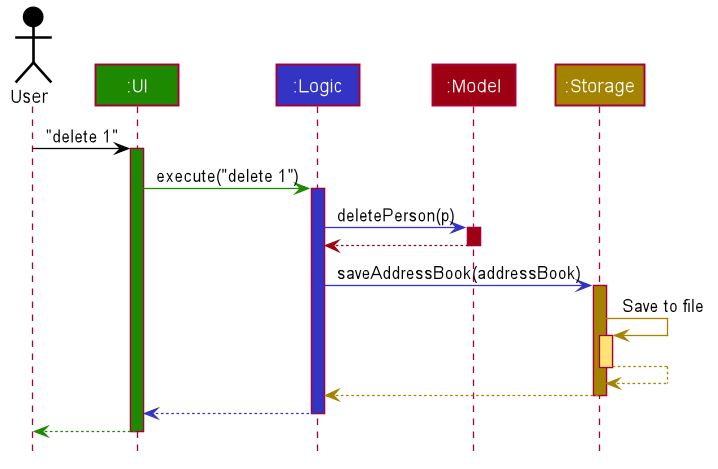
Each of the four main components (also shown in the diagram above),
- defines its API in an
interfacewith the same name as the Component. - implements its functionality using a concrete
{Component Name}Managerclass (which follows the corresponding APIinterfacementioned in the previous point).
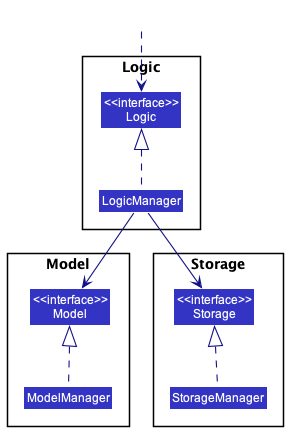
For example, the Logic component defines its API in the Logic.java interface and implements its functionality using the LogicManager.java class which follows the Logic interface. Other components interact with a given component through its interface rather than the concrete class (reason: to prevent outside component’s being coupled to the implementation of a component), as illustrated in the (partial) class diagram below.
The sections below give more details of each component.
UI component
The API of this component is specified in Ui.java
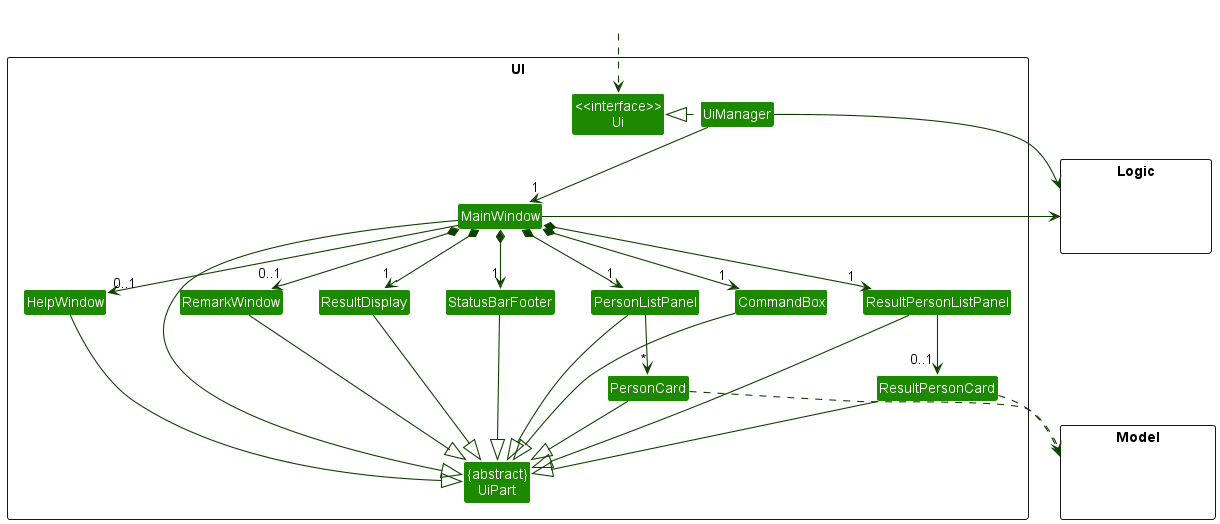
The UI consists of a MainWindow that is made up of parts e.g.CommandBox, ResultDisplay, PersonListPanel, StatusBarFooter etc. All these, including the MainWindow, inherit from the abstract UiPart class which captures the commonalities between classes that represent parts of the visible GUI.
The UI component uses the JavaFx UI framework. The layout of these UI parts are defined in matching .fxml files that are in the src/main/resources/view folder. For example, the layout of the MainWindow is specified in MainWindow.fxml
The UI component,
- executes user commands using the
Logiccomponent. - listens for changes to
Modeldata so that the UI can be updated with the modified data. - keeps a reference to the
Logiccomponent, because theUIrelies on theLogicto execute commands. - depends on some classes in the
Modelcomponent, as it displaysPersonobject residing in theModel.
Logic component
API : Logic.java
Here’s a (partial) class diagram of the Logic component:

How the Logic component works:
- When
Logicis called upon to execute a command, it uses theAddressBookParserclass to parse the user command. - This results in a
Commandobject (more precisely, an object of one of its subclasses e.g.,AddCommand) which is executed by theLogicManager. - The command can communicate with the
Modelwhen it is executed (e.g. to add a person). - The result of the command execution is encapsulated as a
CommandResultobject which is returned back fromLogic.
The Sequence Diagram below illustrates the interactions within the Logic component for the execute("delete 1") API call.
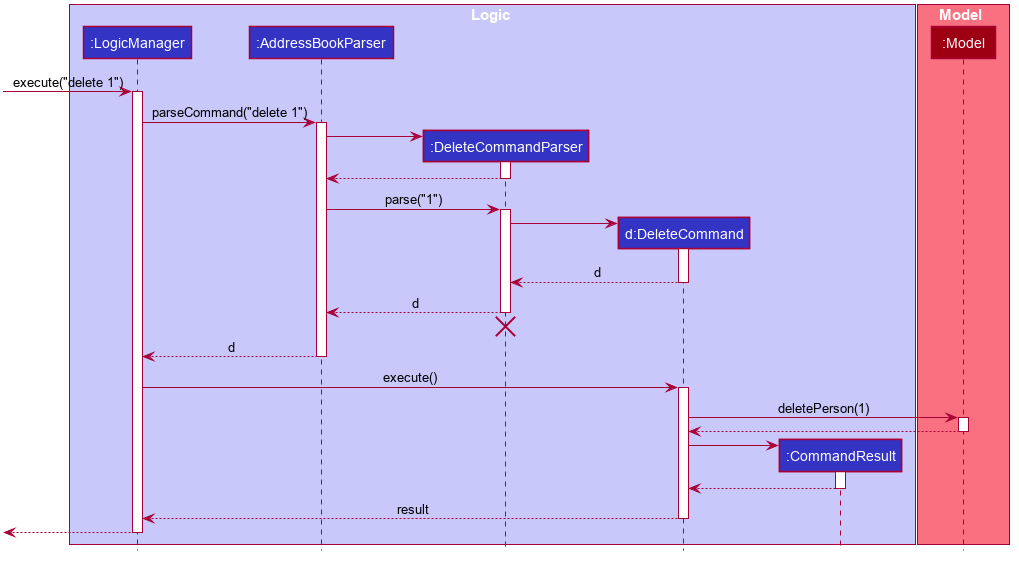
DeleteCommandParser should end at the destroy marker (X) but due to a limitation of PlantUML, the lifeline reaches the end of diagram.
Here are the other classes in Logic (omitted from the class diagram above) that are used for parsing a user command:
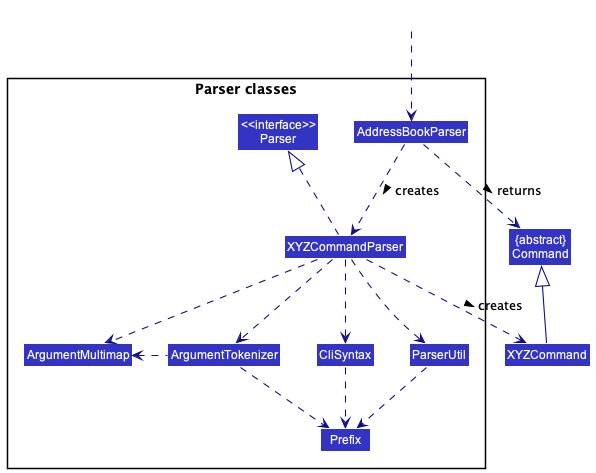
How the parsing works:
- When called upon to parse a user command, the
AddressBookParserclass creates anXYZCommandParser(XYZis a placeholder for the specific command name e.g.,AddCommandParser) which uses the other classes shown above to parse the user command and create aXYZCommandobject (e.g.,AddCommand) which theAddressBookParserreturns back as aCommandobject. - All
XYZCommandParserclasses (e.g.,AddCommandParser,DeleteCommandParser, …) inherit from theParserinterface so that they can be treated similarly where possible e.g, during testing.
Model component
API : Model.java
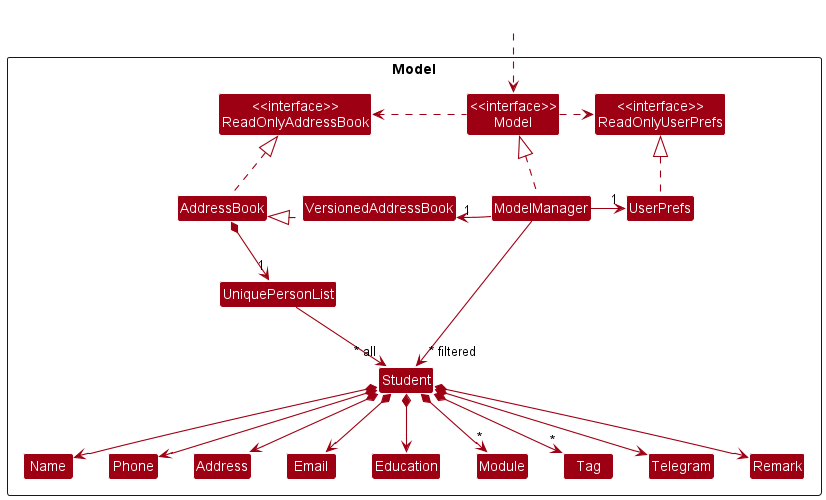
The Model component,
- stores the address book data i.e., all
Personobjects (which are contained in aUniquePersonListobject). - stores the currently ‘selected’
Personobjects (e.g., results of a search query) as a separate filtered list which is exposed to outsiders as an unmodifiableObservableList<Person>that can be ‘observed’ e.g. the UI can be bound to this list so that the UI automatically updates when the data in the list change. - stores a
UserPrefobject that represents the user’s preferences. This is exposed to the outside as aReadOnlyUserPrefobjects. - stores every modified version of the address book in
VersionedAddressBook. - does not depend on any of the other three components (as the
Modelrepresents data entities of the domain, they should make sense on their own without depending on other components)
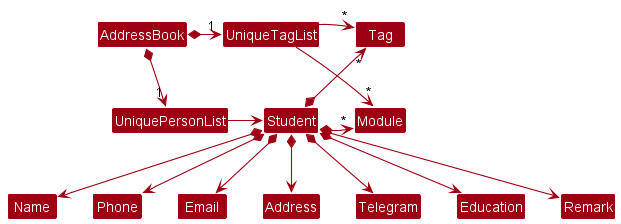
![]() Note: An alternative (arguably, a more OOP) model is given below. It has a
Note: An alternative (arguably, a more OOP) model is given below. It has a Tag and Module list in the AddressBook, which Person references. This allows AddressBook to only require one Tag object per unique tag, and one Module object per unique module instead of each Person needing their own Tag and Module objects.
Storage component
API : Storage.java
The Storage component,
- can save both address book data and user preference data in json format, and read them back into corresponding objects.
- inherits from both
AddressBookStorageandUserPrefStorage, which means it can be treated as either one (if only the functionality of only one is needed). - depends on some classes in the
Modelcomponent (because theStoragecomponent’s job is to save/retrieve objects that belong to theModel)
Common classes
Classes used by multiple components are in the seedu.addressbook.commons package.
Implementation
This section describes some noteworthy details on how certain features are implemented.
Autocomplete feature
Implementation Details
The autocomplete feature is implemented through the AutocompleteEngine class, which is aggregated inside the LogicManager class. The LogicManager class implements the Logic interface, which exposes the AutocompleteEngine methods. The LogicManager initializes the AutocompleteEngine with a predefined Model, and the AutocompleteEngine utilizes methods from the Model interface to access existing tag, module, and education values.
The CommandBox UI class then integrates the autocomplete feature. It listens for user input and queries the Logic interface for suggestions based on the current input.
The public methods of the AutocompleteEngine class are:
-
suggestCommand(String userInput)— Suggests a command (including its arguments) based on the user input. -
autocompleteCommand(String userInput, String commandSuggestion)— Returns the new user input when the user autocompletes the command.
New methods in the Model interface for the autocomplete feature include:
-
getExistingTagValues()— Returns a list of all existing tag values contained in the person list. -
getExistingModuleValues()— Returns a list of all existing module values contained in the person list. -
getExistingEducationValues()— Returns a list of all existing education values contained in the person list.
Feature Details
Given below is an example usage scenario and how the autocomplete mechanism works at each step:
-
Step 1. The user launches the application for the first time. The
LogicManagerinitializes theAutocompleteEnginewith the predefinedModel. -
Step 2. The user types the input
add t/.CommandBoxdetects the change in user input, and calls theLogic::suggestCommandmethod to get suggestions based on the said input. -
Step 3. The
LogicManagerin turn calls theAutocompleteEngine#suggestCommandmethod, which in turn queries theModelfor existing tag, module, and education values. In this example,Model::getExistingTagValues()returns the list["tag1", "tag2"]. Note: For Step 3, since the existing module and education values aren’t used, they’re omitted in this example.
-
Step 4. The
AutocompleteEngineprocesses the user input and existing values to generate the suggestionadd n/tag1 | tag2, and returns it toCommandBox, which displays it to the user in a shadow-like autocomplete suggestion.
Here’s the suggestion sequence diagram showing the above 4 steps:
-
Step 5. The user then presses the
TABkey, andCommandBoxcomponent calls theLogic#autocompleteCommandmethod to complete the user inputadd t/, based on the current suggestionadd t/tag1 | tag2. -
Step 6. The
LogicManagerin turn calls theAutocompleteEngine#autocompleteCommandmethod to generate said suggestion, and returns the autocompleted user inputadd t/tag1toCommandBox, which sets that as the command box value.
Here’s the autocompletion sequence diagram showing the above 2 steps:
If the user types an invalid command-word or index, AutocompleteEngine#suggestCommand will throw a ParseException, which causes the text to be displayed in red.
Design considerations
Aspect: Simple heuristic check vs. full validation of command arguments:
-
Alternative 1 (current choice): Simple heuristic check
- Pros: Less computationally expensive, which avoids lagging the app and hindering fast typists. Easier to implement.
- Cons: Does not provide full validation of command arguments.
-
Alternative 2: Full validation of command arguments using each field’s is-valid methods (e.g.,
Address::isValidAddress,Email::isValidEmail)- Pros: Provides full validation of command arguments.
- Cons:
- More computationally expensive, especially when using regex for validation, which can lag the app and hinder fast typists.
- Harder to implement
- Might constantly highlight the text red, which can be annoying for users who haven’t finished typing.
We chose Alternative 1 because it aligns with the project constraint of targeting users who can type fast. Furthermore, it is easier to implement and provides a smoother user experience without constantly highlighting the text red while typing.
Add Feature
Implementation Details
The implementation of the add command involves creating a new Person object and storing it in AddressBook.
Given below is a class diagram on the Person class and the classes related to its attributes:
The Person object is composed of attributes:
-
Name: The name of the student. -
Phone: The phone number of the student. -
Email: The email address of the student. -
Address: The address of the student. -
Education: The education level of the student. -
Telegram: The telegram handle of the student. -
Module: The modules the TA is teaching the student. -
Remark: Remarks/notes the TA has about the student. -
Tags: Categories a student belong to.
To add details into an attribute, prefixes that represent the attributes can be specified.
Name field is compulsory for the user to add a new entry. Other fields are optional and can be added at a later time.
The java.util.Optional<T> class was utilised to encapsulate the optional logic of the attributes.
Here is a sequence diagram showing the interactions between components when add n/Alice edu/Year 1 is run.:
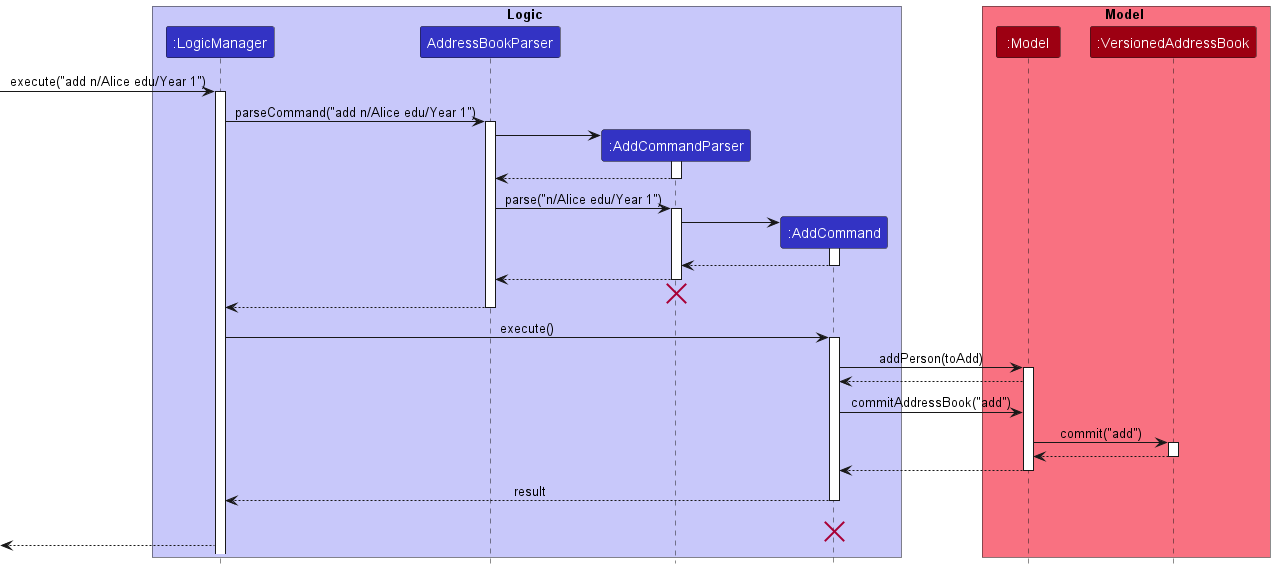
AddCommandParser and AddCommand should end at the destroy marker (X) but due to a limitation of PlantUML, the lifeline reaches the end of diagram.
Feature details
- The app will validate the parameters supplied by the user with pre-determined formats for each attribute.
- If an input fails the validation check, an error message is provided which details the error and prompts the user for a corrected input.
- If the input passes the validation check, a new
Personentry is created and stored in theVersionedAddressBook.
General Design Considerations
Some additions made to the original AB3 attributes are the Education, Module and Remark.
-
Educationis implemented similarly to the other attributes likeAddress, but is modified to fit the logic that a student can only have one education level. -
Moduleis implemented similarly toTagsbut has been modified to accommodate module names that are more than one word long. - Every attribute except
Namehas been made optional during the inputting of the command in case the student’s details are unknown at the time of entry.
Aspect: Optional fields
-
Alternative 1 (current choice): Only
Namehas to be specified to add a newPersonentry.- Pros:
- Improves the user’s convenience by allowing them to add a
Personentry even with limited knowledge about their details.
- Improves the user’s convenience by allowing them to add a
- Cons:
- Many cases of empty/null inputs in the optional fields have to be accounted for when saving the data and testing.
- Pros:
-
Alternative 2: All parameters have to be filled in.
- Pros:
- Easier to implement as there is lesser room for errors when dealing with empty/null inputs among the optional fields
- Cons:
-
addbecomes a lengthy command to execute as unnecessary additional time is needed to enter dummy values to meet the input requirements. - Users are inconvenienced as “useful” entries that can be made are limited to students whose details are all known.
-
- Pros:
Delete feature
Implementation Details
The delete implementation is similar to the implementation in AB3’s codebase. However, we’ve made some additions to support deletion of multiple (unique) indexes.
Here is a sequence diagram showing the interactions between components when delete 1 2 is run.:
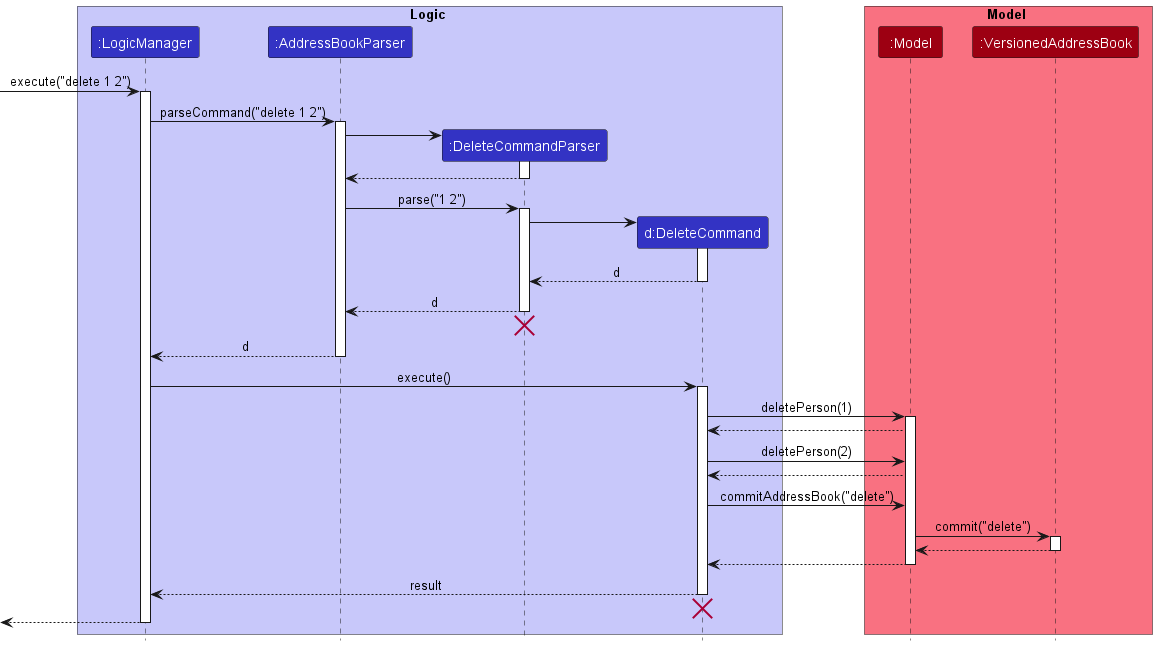
DeleteCommandParser should end at the destroy marker (X) but due to a limitation of PlantUML, the lifeline reaches the end of diagram.
Feature Details
- The
deletecommand supports deleting multiple entries at once by specifying multiple indexes.For example,
delete 1 3 5will delete the entries at indexes 1, 3 and 5 in theAddressBook. - If any of the indexes given is not a positive integer or is out of bounds of the current list of entries, none of the entries will be deleted and an error will be shown.
- If duplicate indexes are given, none of the entries will be deleted and an error will be shown.
- If the command is valid, the entries at the specified indexes will be deleted from the
VersionedAddressBook.
Design Considerations
Taking into consideration that users might make a typo as well as the time cost of using undo (will be explained later) to restore the deleted entries, we believe that if a single invalid INDEX is given, the system should generate an error message.
Aspect: Handling invalid indexes and duplicate indexes in delete
-
Alternative 1: (Current choice) Command is not executed and an error message for is shown.
- Pros:
- As the command input is not cleared in the case of an invalid command, this allows user to edit the erroneous command.
- Cons:
- Harder for users to find the invalid index and correct it.
- Pros:
-
Alternative 2: Delete all valid
Personentries out of the given indexes.- Pros:
- If command only has minor typos, this might save the user time by not needing to editing their command.
- Cons:
- The index of the intended entry to delete might be invalid, so after the other entries with valid indexes are deleted, the user needs to run
deleteagain anyway to fully delete their desired entries. - Reduces the defensiveness of the application, making it more susceptible to bugs and unexpected behaviours.
- The index of the intended entry to delete might be invalid, so after the other entries with valid indexes are deleted, the user needs to run
- Pros:
Edit Feature
Implementation Details
The implementation of edit involves creating a new Person object with updated details to replace the previous Person object.
This is done using the EditPersonDescriptor class, which creates the new Person object.
The edit command has similar input fields represented by prefixes to the add command, with an additional INDEX parameter.
INDEX represents the index number of the student to be edited in the list.
Here is a sequence diagram showing the interactions between components when edit 1 n/Bob edu/Year 2 is run.:

EditCommandParser, EditCommand, and EditPersonDescriptor should end at the destroy marker (X) but due to a limitation of PlantUML, the lifeline reaches the end of diagram.
Feature details
- Similar to
add, the app will validate the parameters supplied by the user with pre-determined formats for each attribute. - If an input fails the validation check, an error message is provided which details the error and prompts the user for a corrected input.
- If the input passes the validation check, the corresponding
Personis replaced by a newPersonobject with the edited attributes and stored in theVersionedAddressBook.
General Design Considerations
Whether a new Person object should be created when editing a student entry.
-
Alternative 1 (Current choice):
editwill create a newPersonobject with the help ofEditPersonDescriptor- Pros:
- Meets the expectations of the immutable
Personclass.
- Meets the expectations of the immutable
- Cons:
- Inefficient as an entire
Personobject is created even if only one field is changed.
- Inefficient as an entire
- Pros:
-
Alternative 2:
editdirectly sets the updated values in the existingPersonobject.- Pros:
- More timely option and space efficient.
- Cons:
- In order to execute this,
Personcannot be immutable, this reduces the defensiveness of the program, making it more susceptible to errors.
- In order to execute this,
- Pros:
Find feature
Implementation Details
The implementation of find involves searching for entries that match all the fields specified.
The find feature supports matching of partial keywords using the StringUtil::containsPartialIgnoreCase, as well as specifying which field to match the keyword in using prefixes.
The find feature uses FullMatchKeywordsPredicate, which implements the Predicate<Person> interface where the test method checks whether the data in the relevant field of a Person contains the specified keyword.
The reason for implementing this feature with Predicate<Person> is that it can be easily used to filter the entire list of Person collected into java’s FilteredList.
Here is a sequence diagram showing the interactions between components when find n/Alice p/12345678 is run.:
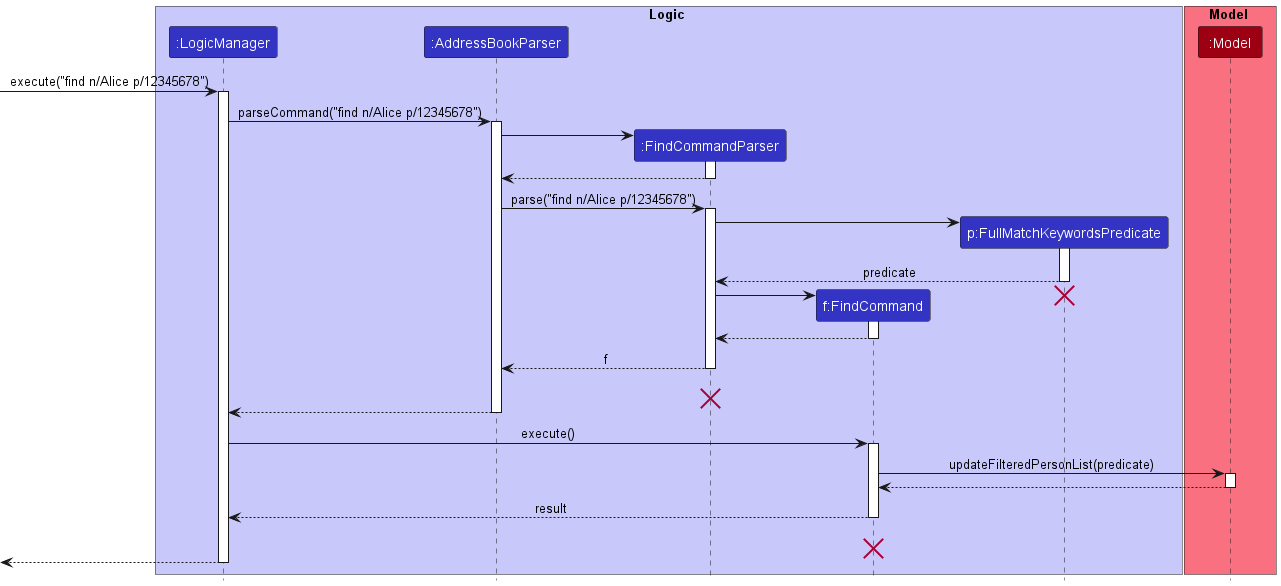
FindCommandParser and FindCommand should end at the destroy marker (X) but due to a limitation of PlantUML, the lifeline reaches the end of diagram.
Feature details
- The
findcommand allows the matching of partial keywords.Take a person’s name to be
Michelle Yeoh.
An example of finding by partial keyword is using “Ye” or “miche” whileKEYWORDwould be “Michelle Yeoh”. - Users are allowed to specify the field that they want to find in by using the default prefixes given to them. This then returns the entry that matches all the fields specified.
The prefixes refer to those that the user input in the
Addcommand, eg.add n/Bob p/98712345 edu/P5In the
findcommand, users are then allowed to input their prefix of choice, eg.find n/bo find p/9871 find edu/p5 a/Pasir Ris
- If
findis used without any fields, it will list all existing entries. - If no entries can be matched, nothing will be shown.
General Design Considerations
The implementation of find is built on top of the original find command in the AB3 codebase as we felt that the default implementation of find was too restrictive.
Our implementation has some modifications such as:
- Allow matching by partial keyword so that the user do not have to input the full keyword everytime.
- Specifying fields to search in by inputting the corresponding prefixes.
Aspect: Command format:
-
Alternative 1 (Current choice):
find [PREFIX KEYWORD/PARTIAL_KEYWORD]...- Pros:
- Improves the user’s convenience as they do not have to type the full keyword everytime.
- Extensible across other attributes.
- Narrows down the list to be very succinct and specific to the desired keyword.
- Cons:
- Adds complexity to the implementation as this implementation introduces a lot of potential errors in parsing the user’s input.
- Might be slightly challenging for new users to enter
PREFIX.
- Pros:
-
Alternative 2:
find [KEYWORD/PARTIAL_KEYWORD]...(With noPREFIX)- Pros:
- Easier to implement as there is lesser validating done by the app.
- Provides the user flexibility in searching across all attributes by default.
- Less syntax to input and learn by the users.
- Cons:
- The filtered list may not be what was desired as short partial keywords like
ais unlikely to result in a succinct list. - Users will not be able to search keywords for a particular attribute.
- The resulting filtered list will span across multiple different fields, where all attributes in all fields containing the specified keyword will be displayed.
- The filtered list may not be what was desired as short partial keywords like
- Pros:
Filter feature
Implementation Details
The filter command involves searching and listing all entries which has a match in at least one field specified.
Similar to find, filter uses StringUtil::containsPartialIgnoreCase for matching of partial keywords, as well as ContainsKeywordsPredicate which implements the Predicate<Person> interface where the test method checks whether the data in the relevant field of a Person contains the specified keyword.
Here is a sequence diagram showing the interactions between components when filter n/Alice p/12345678 is run:
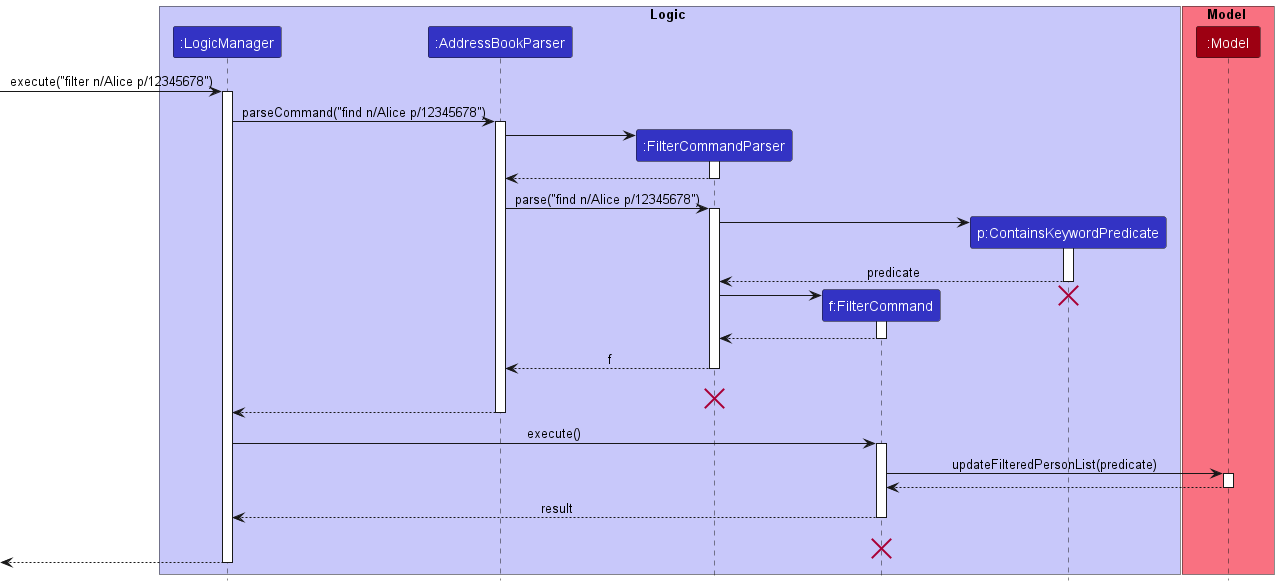
FilterCommandParser and FilterCommand should end at the destroy marker (X) but due to a limitation of PlantUML, the lifeline reaches the end of diagram.
Feature details
- Similar to
find,filterallows matching of partial keywords. - Similar to
find,filterallows different fields to be specified. This will return all entries that match at least one keyword in any fields specified. - If no entries can be matched, an empty list will be shown.
- If
filteris used without any fields specified, an empty list will be shown.
General Design Considerations
The filter was implemented to improve the flexibility of filtering the student list, allowing easier categorisation of students.
Although the function of filter is rather similar to that of find, there might be cases where find is unable to give the desired outcome.
Therefore, a filter feature is implemented on top of find to give users more flexibility in these kinds of scenarios.
For example, take these two different scenarios:
Scenario 1: The TA saved the tutorial timeslot of each student in the
Tagfield and wants to view all students who are either in the 9am class or 1pm class.Scenario 2: The TA wants to see the students who have “lagging behind” as a tag, has a question asked by them saved in the remarks field, and are in the 9am class.
Both scenarios require a different implementation each in order to return the desired results.
Aspect: find or find + filter
-
Alternative 1 (Current choice): Separate into
findandfilter- Pros:
- Allows for better filtering based on the needs of the user as both commands have scenarios that they are each useful in.
- Cons:
- Some of their functionalities might overlap, causing them to be indistinguishable in some scenarios.
- Might be harder for new users to learn the differences between the two commands.
- Pros:
-
Alternative 2: Only have the
findcommand- Pros:
- Easier to learn.
- Cons:
- A single command is unable to implement matching of all fields and matching of at least one field at the same time, so a single command might be inadequate for certain scenarios.
- Pros:
List feature
Implementation Details
The list implementation is identical to the implementation in AB3’s codebase.
The list command makes use of the FilteredPersonList by passing in a dummy Predicate<T> that always evaluates to true,
such that the FilteredPersonList returns every existing Person.
Here is a sequence diagram showing the interactions between components when list is run.:
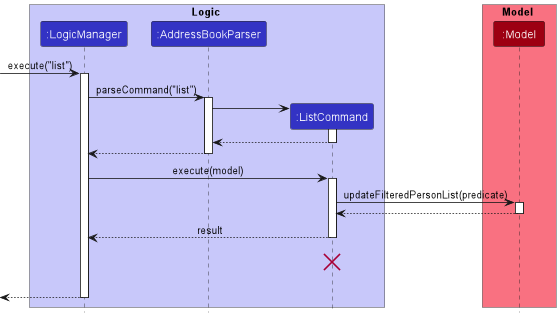
ListCommand should end at the destroy marker (X) but due to a limitation of PlantUML, the lifeline reaches the end of diagram.
Feature Details
-
listshows all existing entries at once.
Design Consideration
The list command does not accept any arguments in order to make it as convenient for users to view their full list of students after a prior command
such as find or filter which displays a filtered list.
Remark feature
Implementation Details
The application provides users with two different methods of entering or editing a remark for a student.
- Using the pop-up text box implemented in this feature.
- Adding the remark through the
addcommand.
Similar to edit, this feature makes use of the EditPersonDescriptor to create a new Person object with the updated remarks. Then, the previous Person object is replaced.
Here is a sequence diagram showing the interactions between components when remark 1 is run (Assuming the existing command is “Absent”, and is to be replaced with “Submitted lab 10”).:
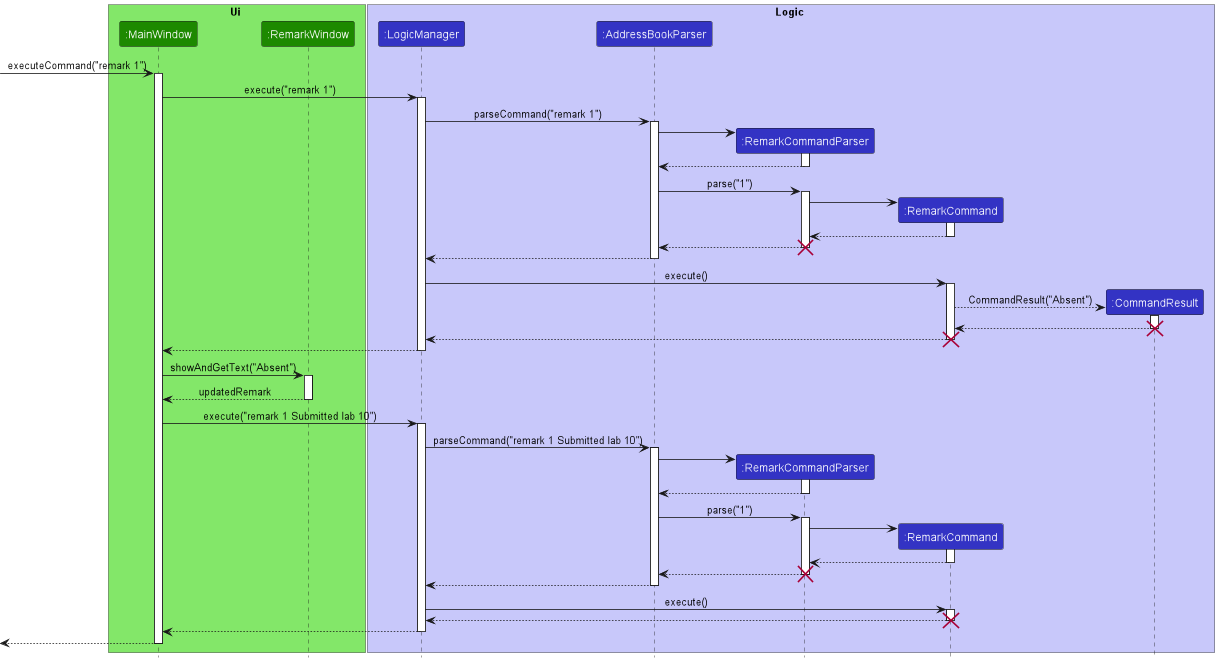
ListCommand should end at the destroy marker (X) but due to a limitation of PlantUML, the lifeline reaches the end of diagram.
In addition, we should take special note of the format for the remark command: remark INDEX [REMARK].
The remark mechanism will be facilitated by a pop-up text box.
They can do this by simply omitting the optional REMARK parameter, which will cause the pop-up text box to appear.
This will allow users to format their remarks however they like, rather than being restricted to a single line in the command line.
Users can use the CTRL + S combination to close the remark box without using the mouse to click on the “X”, thereby
staying true to the goal of catering to fast typists.
We implemented this by keeping the remark INDEX command when it is specified, while pulling up the text box.
When the text box is closed, the remark will be appended entirely to the saved remark INDEX command. This makes it
conform to the remark INDEX REMARK format and this command will be run again.
However, should the user prefer it, they can also directly input their remarks into the pop-up text box
by directly specifying the optional REMARK parameter, thereby skipping the 2-step nature of the command.
Deletion of remarks will be done by specifying an empty remark from the text box.
Currently, to differentiate between deletion of the remark and the remark INDEX command to open the text box,
empty or whitespace only remarks are represented by the null character \0. This means that if the
user somehow types only a single \0 character into the text box, it can be seen as a bug as it will be cleared
upon closing the text box. However, we do not consider this to be a legitimate use of the program, and see no use in
changing the design.
Feature Details
- The remark feature is facilitated by a pop-up text box brought up by using the command
remark INDEX. - The contents of the pop-up text box are saved by pressing
Ctrl + Son the keyboard. - If the content of the remarks is blank, the command will be treated as a remark deletion operation and any existing remarks will be deleted.
- Similar to
edit, a newPersonobject is created with the new remarks and replaces the oldPersonobject in theVersionedAddressBook
General Design Considerations
In order to make this feature as versatile as possible,
the remark feature should consider formatted inputs (eg. new lines to separate paragraphs).
Additionally, we opted for a pop-up text window as the command line only provides a restricted view and input option for users, hence it does not support formatted remarks.
Aspect: Command input format
-
Alternative 1: Adding the
remarkthrough the command line.- Pros:
- Easier to implement.
- Fewer chances of bugs to appear
- Cons:
- Restricts users to a single line or continuous paragraph of remark.
- Limits formatting options for remark.
- Pros:
-
Alternative 2: (Current implementation) Adding remark through a pop-up text window
- Pros:
- Provides users flexibility in the format of their remarks.
- Remarks are not restricted to a single line or continuous paragraph.
- Allows the future implementation of enhanced formatting, like using Markdown.
- Cons:
- More complicated to implement as the format of the remarks have to be saved and loaded into
VersionedAddressBookwithout any formatting errors. - Have to make sure the user does not enter any state-changing commands like
addand evenfind/list.
- More complicated to implement as the format of the remarks have to be saved and loaded into
- Pros:
-
Alternative 3: Adding remark through an in-window text box
- Pros:
- Has the same level of flexibility as Alternative 2.
- No need for a pop-up text window, which could be beneficial for cross-platform support.
- Cons:
- Less intuitive for the user as the user could try to input more commands into the application while editing remarks, which would cause bugs due to the 2-step nature of the command.
- Pros:
Aspect: Remark display
-
Alternative 1: (Current implementation) Preview the first line (truncated) of a student’s remarks under all the other attributes
- Pros:
- Short remarks are instantly visible to users.
- Easy to implement.
- Cons:
- A short remark which has a length slightly over the character limit for truncation can only be viewed via the
show.
- A short remark which has a length slightly over the character limit for truncation can only be viewed via the
- Pros:
-
Alternative 2: If a remark is present, simply display an indicator in
PersonCard- Pros:
- Easy to implement.
- Viewing the remark in
ResultDisplayis supported by theshowcommand. - Supports formatting of
remarksince it is not restricted to thePersonCardview.
- Cons:
- An extra step for users may be inconvenient.
- Inconvenient for short remarks compared to Alternative 1.
- Pros:
-
Alternative 3: Show the full remark in
PersonCardbeside all the other attributes- Pros:
- Remark is directly visible from the list.
- Supports formatting in
remark.
- Cons:
- Remarks are limited to the view of
PersonCardand size of the window. - Remarks that are too long will be cut off and be not fully visible.
- Remarks are limited to the view of
- Pros:
Show feature
Implementation Details
The implementation of show retrieves and shows the information from the Remark field of the entry with the specified index.
Feature Details
- If the
Remarkfield is not empty, the contents of theRemarkfield are shown in theResultDisplaybox, and thePersonListCardof the entry with the specified index is shown below theResultDisplay. - If there are no remarks, a message indicating such is shown in the
ResultDisplay.
General Design Considerations
The show command was implemented to support the remark command,
where this provides a way to view the remarks of an entry other than bringing up the pop-up text box.
Remarks longer than the width of PersonListCard in PersonListPanel will not be visible.
Hence, show allows users to view the full remark in the ResultDisplay where scrolling is supported.
Aspect: Display output
-
Alternative 1: (Current choice) Display the entire
PersonCardof the student chosen in theResultDisplay- Pros:
- Supports the
remarkcommand as intended since scrolling is possible. - Allows users to view the student details and remarks all at once.
- Supports the
- Cons:
- Harder to implement.
- Pros:
-
Alternative 2: Display the entire
PersonCardof the student chosen inPersonListPanel.- Pros:
- Allows users to view the student details and remarks all at once.
- Supports the
remarkcommand as intended.
- Cons:
- May reduce user convenience as
show INDEXwill likely always be followed with thelistcommand to toggle back to the full list of students. - Harder to implement as the size of the
PersonCardfor thePersonhas to be updated every timeshowis executed.
- May reduce user convenience as
- Pros:
Undo/Redo feature
Implementation Details
This feature involves restoring the current address book to its previous version after a command altering the address book is executed.
Examples of such commands are:
The undo/redo mechanism is facilitated by VersionedAddressBook. It extends AddressBook with an undo/redo history, stored internally as a versionStateHistory and currentVersionPointer. Additionally, it implements the following operations:
-
VersionedAddressBook#commit()— Saves the current address book state in its history as well as the command that was last executed. -
VersionedAddressBook#undo()— Restores the previous address book state from its history. -
VersionedAddressBook#redo()— Restores a previously undone address book state from its history.
These operations are exposed in the Model interface as Model#commitAddressBook(), Model#undoAddressBook() and Model#redoAddressBook() respectively.
Feature Details
Given below is an example usage scenario and how the undo/redo mechanism behaves at each step.
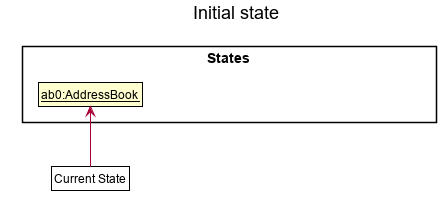
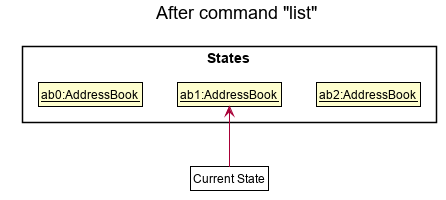
Step 1. The user launches the application for the first time. The VersionedAddressBook will be initialized with the initial address book state, and the currentVersionPointer pointing to that single address book state.
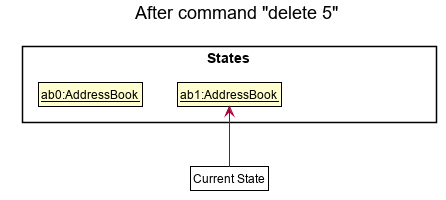
Step 2. The user executes delete 5 command to delete the 5th person in the address book. The delete command calls Model#commitAddressBook(), causing the modified state of the address book after the delete 5 command executes to be saved in the addressBookStateList, and the currentVersionPointer is shifted to the newly inserted address book state.
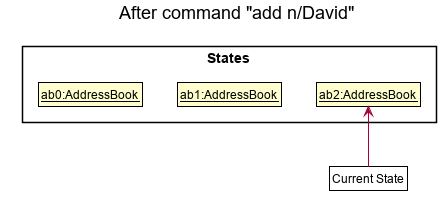
Step 3. The user executes add n/David … to add a new person. The add command also calls Model#commitAddressBook(), causing another modified address book state to be saved into the addressBookStateList.
Model#commitAddressBook(), so the address book state will not be saved into the addressBookStateList.
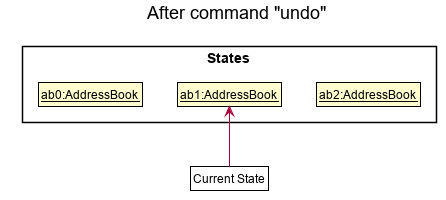
Step 4. The user now decides that adding the person was a mistake, and decides to undo that action by executing the undo command. The undo command will call Model#undoAddressBook(), which will shift the currentVersionPointer once to the left, pointing it to the previous address book state, and restores the address book to that state.
currentVersionPointer is at index 0, pointing to the initial AddressBook state, then there are no previous AddressBook states to restore. The undo command uses Model#checkUndoable() to check if this is the case. If so, it will return an error to the user rather than attempting to perform the undo operation.
The following sequence diagram shows how the undo operation works (assuming VersionedAddressBook is undoable):
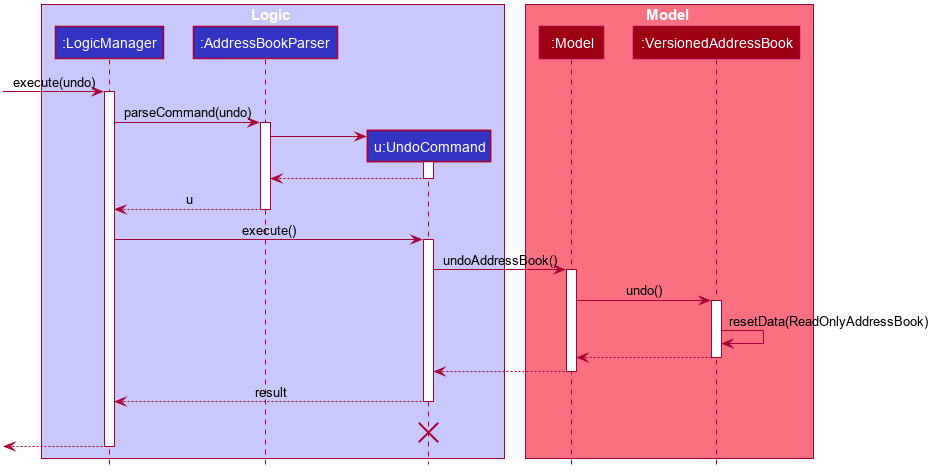
UndoCommand should end at the destroy marker (X) but due to a limitation of PlantUML, the lifeline reaches the end of the diagram.
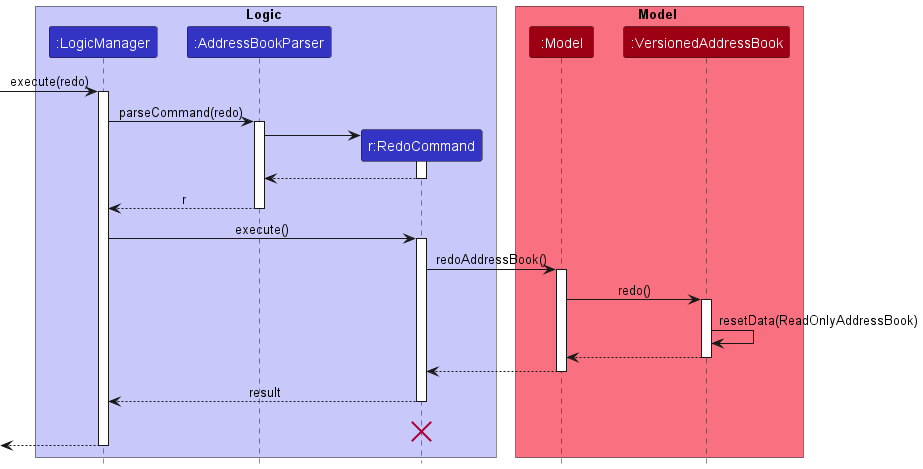
The redo command does the opposite — it calls Model#redoAddressBook(), which shifts the currentVersionPointer once to the right, pointing to the previously undone state, and restores the address book to that state.
The following sequence diagram shows how the redo operation works (assuming VersionedAddressBook is redoable):
currentVersionPointer is at index addressBookStateList.size() - 1, pointing to the latest address book state, then there are no undone AddressBook states to restore. The redo command uses Model#checkRedoable() to check if this is the case. If so, it will return an error to the user rather than attempting to perform the redo.
Step 5. The user then decides to execute the command list. Commands that do not modify the address book, such as list, will not call Model#commitAddressBook(), Model#undoAddressBook() or Model#redoAddressBook(). Thus, the addressBookStateList remains unchanged.
Step 6. The user executes clear, which calls Model#commitAddressBook(). Since the currentVersionPointer is not pointing at the end of the addressBookStateList, all address book states after the currentVersionPointer will be purged. Reason being it no longer makes sense to redo the add n/David … command. This is the behavior that most modern desktop applications follow.
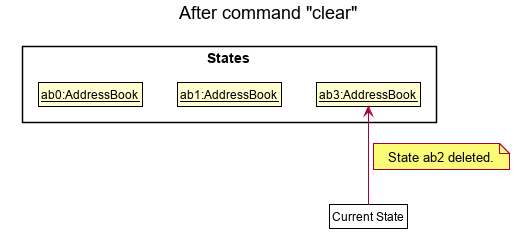
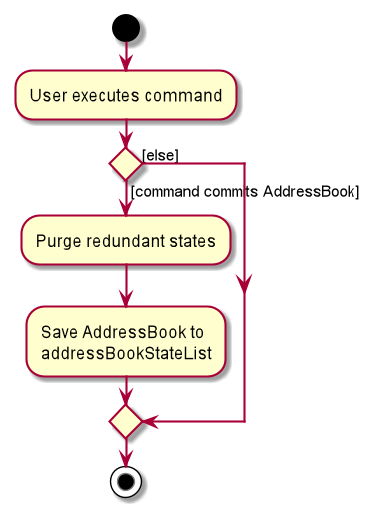
The following activity diagram summarizes what happens when a user executes a new command:
Design considerations:
Aspect: How undo & redo executes:
-
Alternative 1 (current choice): Saves the entire address book.
- Pros:
- Easy to implement.
- Cons:
- May have performance issues in terms of memory usage.
- Pros:
-
Alternative 2: Individual command knows how to undo/redo by
itself.
- Pros:
- Will use less memory (e.g. for
delete, just save the person being deleted).
- Will use less memory (e.g. for
- Cons:
- We must ensure that the implementation of each individual command is correct.
- Pros:
Aspect: Command History:
-
Alternative 1 (current choice): Only saves the commands that modify the address book.
- Pros:
- Easy to implement.
- Cons:
- Reduces user experience as keeping track of all commands will also allow us to improve the error messages by specifying the specific recent command which does not allow
undoorredo
- Reduces user experience as keeping track of all commands will also allow us to improve the error messages by specifying the specific recent command which does not allow
- Pros:
-
Alternative 2 : Save every command executed regardless of whether it modifies the address book.
- Pros:
- Improves user experience by improving the quality of the error message for
undoandredo.
- Improves user experience by improving the quality of the error message for
- Cons:
- Slightly more complicated to implement as a separate
currentStatePointerfor the command history will have to be added.
- Slightly more complicated to implement as a separate
- Pros:
Documentation, logging, testing, configuration, dev-ops
Appendix: Requirements
Product scope
Target user profile:
- Teaching Assistants (TAs)/tutors who have a class of students to manage and are preferably proficient typists.
Value proposition:
- TeachMeSenpai acts as an optimised application for tutors to manage their students’ data and obtain insights on their students’ data.
User stories
Priorities:
-
HIGH(must have) -
MED(nice to have) -
Low(unlikely to have)
| Priority | As a … | I want to … | So that I can… |
|---|---|---|---|
HIGH |
tutor | open the app | begin using the app |
HIGH |
tutor | close the app | leave the app |
HIGH |
tutor | add a student’s name | track a student’s progress by their name |
HIGH |
tutor | include student’s education level when adding the student (eg. P6) | keep track of a student’s education level |
HIGH |
tutor | include student’s phone number when adding the student (eg. 94206942) | keep track of a student’s phone number |
HIGH |
tutor | include student’s email when adding the student (eg. iloveanimegirls@gmail.com) | keep track of a student’s email |
HIGH |
tutor | include student’s address when adding the student (eg. Block 69 S642069) | keep track of a student’s address and go to the place easily |
HIGH |
tutor | include the modules I’m teaching a student to their entry (eg. CS2101, CS4243) | keep track of what modules I’m teaching the student |
HIGH |
tutor | include optional student-specific notes when adding the student (eg. Good in Japanese) | store information for a particular student such as notes and remarks |
HIGH |
tutor | include tags on a student to group them by categories (eg. classes) | categorise my students into groups. |
HIGH |
tutor | delete a student entry from my list by index(es) | remove all details related to a certain student |
HIGH |
tutor | have my changes saved automatically | be sure that I won’t lose my changes if I crash/close the app |
HIGH |
tutor | view my list of students | keep track of who I’m currently teaching |
HIGH |
tutor | View the address of a student | know where to go if I need to provide tuition at their house |
HIGH |
tutor | have my data persist between use sessions | continue my session where I left off |
HIGH |
tutor | find my students by searching their names | quickly view that student’s details |
HIGH |
tutor | edit a student’s name | correct a student’s name |
HIGH |
tutor | edit the modules I’m teaching a particular student | update or correct a student’s records |
HIGH |
tutor | edit a student’s education level | update or correct a student’s records |
HIGH |
tutor | receive an appropriate and user-friendly error message when I enter the wrong inputs/parameters for a command | find out the correct input/parameter format and use the feature as intended |
HIGH |
tutor | be able to ask for help | learn how to use the app |
MED |
tutor | filter my students by education level (eg. all P6 students) | view my students of the same education level |
MED |
tutor | filter my students by modules | view all the student’s I’m teaching a particular module to |
MED |
tutor | filter my students by address (eg. Ang Mo Kio) | view all the students who live in a particular area |
MED |
tutor | filter my students by email (eg. @gmail) | view all the students with similar emails |
MED |
tutor | filter my students by tags (eg. active) | view all my students with the same qualities |
MED |
tutor | sort my students by their names | view my students in a systematic manner |
MED |
tutor | sort my students by their education level | view my students according to their education level |
Use cases
For all use cases below, the System is the TeachMeSenpai app and the Actor is the user, unless specified otherwise.
Use case UC1: Add a student
MSS
- User request to add a new student’s name and particulars.
-
System adds new student and their particulars as a new entry in the list
Use case ends
Extensions
- 1a. The given name/particulars is invalid
-
1a1. System shows an error message
Use case resumes from step 1.
-
- 1b. The compulsory name field is missing
-
1a1. System shows an error message
Use case resumes from step 1.
-
- 1c. A student entry with the same name exists in the list
-
1c1. System shows an error message
Use case resumes from step 1.
-
- 1d. Some optional particulars are missing
-
1d1. System adds new student, leaving their particulars blank
Use case ends
-
Use case UC2: Find a student
MSS
- User requests to find a specific set of students based on a set of criteria
-
System shows a list of students that match the criteria
Use case ends
Extensions
- 1a. The field to search in specified by the user is empty
-
1a1. System shows an error message
Use case resumes from step 1.
-
- 1b. The field to search in is not specified by the user
- 1b1. System defaults to searching the keyword in the name field
-
1b2. System shows a list of students whose names match the keyword
Use case ends
- 1c. The field and keyword are not specified by the user
-
1c1. System shows an error message
Use case resumes from step 1
-
Use case UC3: Delete students
MSS
- User requests to list students
- System shows a list of students
- User requests to delete multiple students in the list by their indexes from the list
-
System deletes the students
Use case ends
Extensions
- 1a. User requests to find a specific set of students based on a set of criteria
- 1a1. System shows a list of students which matches the criteria input by the user
- 1a2. User requests to delete a specific student in the list by their index from the list
-
1a3. System deletes the student
Use case ends
-
2a. The list is empty
Use case ends
- 3a. A given index is invalid
-
3a1. System shows an error message
Use case resumes at step 2
-
- 3b. Duplicated indexes is given
-
3b1. System shows an error message
Use case resumes at step 2
-
Use case UC4: List student(s)
MSS
- User requests to list all the students.
-
System shows the list of all students.
Use case ends.
Extensions
- 1a. Additional parameters are added behind
list.-
1a1. System shows an error message.
Use case ends.
-
Use case UC5: Update remarks
MSS
- User requests to list students
- System shows a list of students
- User requests to edit a student’s remarks of a specific student in the list by their index from the list
- System shows a pop-up text box
- User enters remarks in the text box
- User exits from the text box
-
System saves the remarks
Use case ends
Extensions
-
2a. The list is empty
Use case ends
- 3a. The given index is invalid
-
3a1. System shows an error message
Use case resumes at step 2
-
- 5a. The inputted remarks is empty
- 5a1. System deletes the old remarks
-
5a2. System saves with no remarks
Use case ends
Use case UC6: Edit particulars
MSS
- User requests to edit a student’s particulars based on their index in the list displayed
-
System replaces the specified fields with the new details
Use case ends
Extensions
- 1a. The field to edit is not specified
-
1a1. System shows an error message
Use case resumes from step 1
-
- 1b. The index is given is invalid
-
1b1. System shows an error message
Use case resumes from step 1
-
- 1c. The field is specified but the details are empty
-
1c1. System deletes the information in the specified field
Use case ends
-
Use case UC7: Exiting the application
MSS
- User requests to exit the application
- System saves all data into a local file
-
System exits from the application
Use case ends
Non-Functional Requirements
- A user that is completely new to the application should be able to be familiar with the functionalities within 1 hour.
- System should respond within 0.1 second of the user providing an input.
- All systems must be able to access the save file ie. Save file should be independent of the OS.
- Any information displayed should be concise and structured in a logical manner such that it is easily understandable.
- Should work on any mainstream OS as long as it has Java
11or above installed. - Should be able to hold up to 1000 students without a noticeable sluggishness in performance for typical usage.
- A user with above average typing speed for regular English text (i.e. not code, not system admin commands) should be able to accomplish most of the tasks faster using commands than using the mouse.
Glossary
- Tutors: (NUS) Teaching Assistants.
- Mainstream OS: Windows, Linux, Unix, OS-X
- Private contact detail: A contact detail that is not meant to be shared with others
- Save File: The file containing all the data (ie. Entries of student information) inputted by the user saved locally on the user’s own computer.
Prefix summary
| Prefix | Meaning | Example |
|---|---|---|
| n/ | Name of student | n/Shao Hong |
| p/ | Phone number of student | p/81234567 |
| e/ | Email of student | e/e07123456@u.edu.sg |
| a/ | Address of student | a/16 Bukit Timah Road, S156213 |
| edu/ | Education level of student | edu/P6 |
| r/ | Remark for student | r/Good in German |
| t/ | Tag of student |
t/active or t/hardworking ...
|
| m/ | Module that the student is being taught |
m/CS2101 or m/CS2101 m/CS4243 ...
|
| tele/ | Telegram handle of the student |
tele/@chuuchuu or tele/@sO_m4nY
|
Appendix: Effort
Evolving AB3 into TeachMeSenpai had a set of challenges and obstacles our team had to work around.
The initial difficulty faced involved getting used to the forking workflow of the project as Git was still new to most of the group.
There were also concerns around remark feature as our team initially intended for it to be a text box within TeachMeSenpai’s MainWindow.
However, as our team was not familiar with JavaFX, it was not as feasible as the pop-up text box window our team settled on. We also included keyboard shortcuts for exiting the pop-up window to not compromise our goal of creating an app targeted at fast-typists.
One challenge we ran into during the project surfaced after an initial testing of our app where we discovered some inconsistent error handling. However, due to time constraints, we were not able to enhance the specificity of our error messages. If given more time, this would be an aspect our team would not have compromised. The time constraint also resulted in the inability to refactor a large portion of AB3’s code to be specific to our app (Student, and StudentBook instead of Person, and AddressBook). However, since our priority was to evolve AB3 to meet the needs of teaching assistants, we prioritised the functionality of our app over the backend details. If given more time, we would definitely have refactored the code.
Lastly, TeachMeSenpai was no easy feat and a portion of the app contains code adapted and reused from past semester’s projects.
Our autocomplete feature was inspired by a similar feature in AY2223S1-CS2103T-T12-2’s tp. We started our with their code, and slowly but surely revamped the code.
This included refactoring, bug-fixing, adding asserts and changing the behaviour of the feature to suit our needs such as prefixes, commands, and parameters specific to our app.
The idea of adding the placeholder text to the Prefix class also came from AY2223S1-CS2103T-T12-2’s tp, which gave us the idea to add onto the prefix (like whether the prefix is optional), although the initial idea for optional prefixes was our idea.
Finally, the undo and redo features were reused with modifications from AY2223S1-CS2103T-W17-4’s tp, which was adapted from the proposed implementation in AB3’s Developer Guide DG as well. The changes include renaming, some different implementation, bug fixing, and modification to include a variable to track the undone/redone commands in the VersionedAddressBook class.
We also encapsulated the CommandHistory within the VersionedAddressBook.
Appendix: Planned enhancements
The current version of TeachMeSenpai certainly has its flaws and here are some of our plans for future enhancements to improve TeachMeSenpai further for TAs.
Add/Edit
Feature flaw 1
Currently, name fields are case-sensitive so an input like Shaun and shaun will be considered as unique names. A planned enhancement for the name field is to check for case-insensitivity in add and edit in order to disallow such duplicate names.
Feature flaw 2
Currently, name fields allow alphanumeric characters only. This means that inputs like:
-
Mary 2is allowed -
Roy s/o Balakrishnanis not allowed (contains/) -
John D. Smithis not allowed (contains.) -
D'Angelois not allowed (contains') - Elon Musk’s son’s name
X AE A-XIIis not allowed (contains-)
In order to make the app more inclusive, the name field will be enhanced to allow the characters ., ', ', but not the / symbol as in Roy s/o Balakrishnan, as in this case it can be parsed as the s/ prefix and cause other problems.
We still plan to allow numbers in names to allow users to number their student names (eg. Shaun 1, Shaun 2) in the case where students having same names.
Feature flaw 3
Currently, duplicate Telegram handle and phone fields are allowed. This means that entries like add n/Shaun p/000 and add n/Shao Hong p/000 as well as add n/Shaun tele/@sh123 and add n/Shao Hong tele/@sh123 are valid.
However, in reality phone numbers and telegram handles are unique so our future implementations will check that the student list can only contain unique telegram handles and phone numbers.
Feature flaw 4
Currently, the edit feature allows editing all fields except for remarks and the only way to edit remarks is by using the remark feature which may inconvenience users. We planned to improve the edit feature to support edit INDEX r/, allowing users to edit their remarks directly from the command line.
Autocomplete
Feature flaw
Currently, the autocomplete simply checks that the given prefixes and its parameters are valid, however for the add feature, the autocomplete doesn’t check for the presence of the compulsory n/NAME input which
leads users to believe that their input (without n/NAME) is valid. Following the requirements of the add feature, we plan to improve autocomplete by ensuring it checks for n/NAME.
Find/Filter
Feature flaw
Currently, we don’t explicitly handle the case of argument-less find/filter nor do we disallow it, which results in the behaviour where argument-less find shows all users, while filter shows none.
Let’s say argument-less find/filter is allowed, the possible behaviours could be:
- to list all persons (which is the purpose of
list) - to list no persons (which is not useful)
Both behaviours don’t add value to the app. Thus, we plan to disallow argument-less find/filter commands and give an error message encouraging users to add arguments if they use find/filter without any arguments.
Ui
Feature flaw
Currently, all the labels except for remarks are truncated. When the texts are too long, they do not wrap, especially for long tags and when the window is resized. To improve user experience, we plan to wrap text for long names, address, email, telegram handle, and the tags component.
General
Feature Flaw
Currently, the user will experience noticeable performance issues starting from around ten entries, with the lag becoming more significant the more entries there are. We plan to optimise the application by making saving, reading and writing data to and from the local save file more efficient, as well as optimise the commands to be more efficient to tackle this issue in the future.
Error handling
Feature flaw
Currently, the error message for an invalid telegram handle is “Telegram handle can take any valid telegram handle, and it should not be blank.” We plan to replace it with a more helpful error message such as “A telegram handle should be in the form @abc_hi.” in addition to the current message. There the requirements for a telegram handle can be detailed so users can reference the error message and improve their input.
Appendix: Instructions for manual testing
Given below are instructions to test the app manually.
Launch and shutdown
-
Initial launch
- Download the jar file and copy into an empty folder
- Double-click the jar file Expected: Shows the GUI with a set of sample contacts. The window size may not be optimum.
-
Saving window preferences
- Resize the window to an optimum size. Move the window to a different location. Close the window.
- Re-launch the app by double-clicking the jar file.
Expected: The most recent window size and location is retained.
Command suggestion and autocompletion
-
Suggesting and autocompleting a command
- Test case: Type
a, then pressTABkey
Expected: It displays the suggestion for theaddcommand along with all its arguments, then autocompletes the word “add” upon pressingTAB.
- Test case: Type
-
Suggesting and autocompleting arugment prefixes
-
Test case: Type
add, then pressTABkey
Expected: It displays the suggestion for theaddcommand’s arguments, then autocompletes first argumentn/upon pressingTAB. -
Test case: Type
add e, then pressTABkey
Expected: It displays the suggestion for theaddcommand’s arguments that start with “e”, then autocompletes first such argumente/upon pressingTAB.
-
-
Suggesting and autocompleting existing arugment values
-
Prerequisites: A student in the list has the tag
tag1, and another having the tagtag2, and no other student has tags other thantag1andtag2. -
Test case: Type
add t/, then pressTABkey
Expected: It displays the suggestion for the 2 existing tags astag1 | tag2, then autocompletes first existing tagtag1upon pressingTAB.
-
Deleting a student / multiple students
-
Deleting a student while all students are being shown
-
Prerequisites: List all students using the
listcommand. Multiple students in the list. -
Test case:
delete 1
Expected: First entry is deleted from the list. Details of the deleted student shown in the status message. -
Test case:
delete 0
Expected: No student is deleted. Error details shown in the status message. Status bar remains the same. -
Other incorrect delete commands to try:
delete,delete x,...(where x is larger than the list size)
Expected: Similar to previous.
-
-
Deleting multiple students while all students are being shown
-
Prerequisites: List all students using the
listcommand. Multiple students in the list. -
Test case:
delete 1 2
Expected: First and second entries are deleted from the list. Details of the deleted students shown in the status message. -
Test case:
delete 0 1
Expected: No students are deleted. Error details shown in the status message. Status bar remains the same.
-
-
Deleting one / multiple student(s) while on a filtered list
-
Prerequisites: Filter the students using the
findorfiltercommand such that there are at least 2 students in the filtered list. -
Test case:
delete 1
Expected: First entry is deleted from the list. Details of the deleted student shown in the status message. -
Test case:
delete 1 2
Expected: First and second entries deleted from the list. Details of the deleted students shown in the status message. -
Test case:
delete 0 1
Expected: No students are deleted. Error details shown in the status message. Status bar remains the same.
-
Adding a student
-
Adding a student while all students are being shown
-
Prerequisites: List any existing students using the
listcommand. -
Test case:
add n/Shaun
Expected: New student is added to the bottom of the student list. Details shown only include the name. -
Test case:
add n/Shaun n/Benny
Expected: New student is added to the bottom of the student list. Details shown only includes the last parameter specified,Benny. -
Test case:
add n/Shaun xxx/PARAMETER...(where xxx is any of the valid prefixes, PARAMETER is any valid input for the respective prefix and … indicates any number of optional prefixes etc.)
Expected: Similar to previous, details included in the entry are the valid inputs specified. -
Test case:
add p/999
Expected: No student is added to the list. The error message shown detailsInvalid command format!followed by theaddcommand format and example. -
Test case:
add
Expected: No student is added to the list. Same as previous. -
Test case:
add n/???
Expected: No student is added to the list. The error message shown details the requirements for a valid name parameter input. -
Test case:
add n/Shaun xxx/
Expected: No student is added to the list. Same as previous. -
Other incorrect
addcommands to try:add n/Shaun xxx/INVALID_PARAMETER(where xxx is any of the valid prefixes, INVALID_PARAMETER is an invalid parameter input for the respective prefix).
Expected: Same as previous, except error message is xxx prefix specific.
-
Editing a student entry
-
Editing a student while all students are being shown
-
Prerequisites: List all students using the
listcommand. Multiple students in the list. -
Test case:
edit 1 n/Shaun
Expected: Student entry at position 1 of the student list will have their name updated toShaun -
Test case:
edit 1 n/Shaun n/Benny
Expected: Student entry at position 1 of the student list will have their name updated to the last parameter,Benny. -
Test case:
edit 1 xxx/PARAMETER...(where xxx is a valid prefix and PARAMETER is a valid input for the respective prefix and … indicates any number of additional xxx/PARAMETER)
Expected: Same as before except updated/added detail(s) are the specified inputs. -
Test case:
edit
Expected: No student in the list is edited. The error message shown detailsInvalid command format!followed by theeditcommand format and example. -
Test case:
edit 1 i/
Expected: Same as previous. -
Test case:
edit 1
Expected: No student in the list is edited. The error message shown statesThe person index provided is invalid. -
Test case:
edit xxx(where xxx is any invalid index such as 0, -1, an index greater than the length of the list)
Expected: Same as previous. -
Test case:
edit 1 n/???
Expected: No student in the list is edited. The error message shown details the requirements for a valid name parameter input. -
Test case:
edit 1 xxx/INVALID_PARAMETER...(where xxx is a valid prefix and INVALID_PARAMETER is an invalid parameter input for the respective prefix)
Expected: Similar to previous, except error message is specific to the first prefix with an invalid parameter.
-
Find student entries
-
Finding students while all students are being shown
-
Prerequisites: List all students using the
listcommand. -
Test case:
find
Expected: All students will be listed. -
Test case:
find xxx/(where xxx is any parameters other than t/ and m/)
Expected: All students will be listed. -
Test case:
find x/(where xxx is parameters t/ or m/)
Expected: No students will be listed. -
Test case:
find yyy(where yyy is anything)
Expected: Error message showsInvalid command format!followed by thefindcommand format and example. -
Test case:
find xxx/KEYWORD(where xxx is any valid prefix except t/ and m/ and yyy is any keyword)
Expected: Entries in the field of xxx with data partially matching with the whole of yyy will be shown. -
Test case:
find x/KEYWORD(where xxx is either t/ or m/, yyy is any keyword)
Expected: Entries in the x field with data that fully matches with yyy will be shown. -
Test case:
find xxx/KEYWORD...(where aaa is any valid prefix, xxx is any keyword, … refers to multiple aaa/xxx)
Expected: Entries that matches with all fields of aaa will be shown. -
Test case:
find INVALID_PREFIX/KEYWORD
Expected: Error message showsInvalid command format!followed by thefindcommand format and example.
-
Filter student entries
-
Filtering students while all students are being shown
-
Prerequisites: List all students using the
listcommand. -
Test case:
filter
Expected: No students will be listed. -
Test case:
filter xxx/(where xxx is any parameters other than t/ and m/)
Expected: All students will be listed. -
Test case:
filter x/(where xxx is parameters t/ or m/)
Expected: No students will be listed. -
Test case:
filter yyy(where yyy is anything)
Expected: Error message showsInvalid command format!followed by thefindcommand format and example. -
Test case:
filter xxx/KEYWORD(where xxx is any valid prefix except t/ and m/ and yyy is any keyword)
Expected: Entries in the field of xxx with data partially matching with the whole of yyy will be shown. -
Test case:
filter x/KEYWORD(where xxx is either t/ or m/, yyy is any keyword)
Expected: Entries in the x field with data that fully matches with yyy will be shown. -
Test case:
filter xxx/KEYWORD...(where aaa is any valid prefix, xxx is any keyword, … refers to multiple aaa/xxx)
Expected: Entries that matches with at least one fields of aaa will be shown. -
Test case:
filter INVALID_PREFIX/KEYWORD
Expected: Error message showsInvalid command format!followed by thefindcommand format and example.
Showing a student entry
-
Showing a student entry while all students are being shown
-
Prerequisites: List all students using the
listcommand. At least 1 student in the list. -
Test case:
show 1
Expected: Student entry at position 1 shows up in theResultPersonListPanelon the bottom right of the window. Details shown includes all non-empty fields and the full (non-truncated) remark if any. -
Test case:
show 1 EXTRANEOUS_INPUTS(where EXTRANEOUS_INPUTS are irrelevant inputs)
Expected: No student entry is shown. The error message shown detailsInvalid command format!followed by theshowcommand format and example. -
Test case:
show
Expected: Same as previous. -
Test case:
show 0
Expected: No student entry is shown. The error message shown statesThe person index provided is invalid. -
Other incorrect show commands to try:
show xxx(where xxx is an invalid number/characters such as -1, or a number greater than the list size)
Expected: Same as previous.
-
Editing a student’s remarks
-
Editing a student’s remarks while all students are being shown
-
Prerequisites: List all students using the
listcommand. At least 1 student in the list.-
Test case:
remark 1followed by enteringThis is a test remark, thenCTRL+Sto save
Expected: Pop up window appears for the entering of remarks. Status message is “Editing remarks…”. Upon pressingCTRL+S, pop up window closes and remarks for first entry edited to become “This is a test remark”. -
Test case:
remark 0
Expected: No pop-up box appears. The error message shown statesThe person index provided is invalid.
-
-
Prerequisites: Student at index 1 has some remarks written.
-
Test case:
remark 1followed by removing all existing remarks, thenCTRL+Sto save
Expected: Pop up window appears for the entering of remarks. Status message is “Editing remarks…”. The remarks for the first entry is displayed in the text box. After pressingCTRL+Safter removing all existing remarks, pop up window closes and remarks for first entry is deleted. -
Test case:
remark 1 This is a test remark
Expected: No pop up window appears. Status message displays details of first entry, with the remark changed toThis is a test remark.
-
-
Other incorrect remark commands to try:
remark,remark x,remark -1.
Expected: Pop up window does not appear. No remarks are edited. Error details shown in the status message. Status bar remains the same.
-
Saving data
-
Dealing with missing/corrupted data files
- Go into the (non-empty) data file, and remove the final
}which should be on the last line. The json object is now invalid. - Start up TeachMeSenpai again.
- Student list should now be populated with the dummy/default student data, regardless of the data that was in the data file previously.
- Go into the (non-empty) data file, and remove the final